🛠️ What Have You Done To Your LC250 Today?

This is awesome! This is exactly the low profile look I’m trying to get. S/O to PurelyAbrasive even helped me out as well. How many lunes are these lights? Mind providing a link to it?
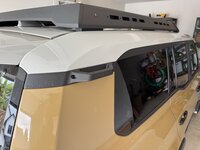
I don’t think they’re much more than about 200 lumens each, and all four total only pulling 7 watts. I just wanted lights that could be small enough to be hidden and when camping, just give a small amount of light for ambience and walking around the camp site. This micro LED's are the smallest I could find--> DuneGear

The angle of the rack prevents the use of so many 45 degree mounts that are available. The lights don't shine as downward as I would like, but give a nice diffuse flood to the area.

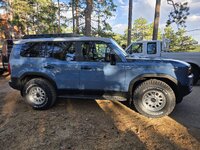
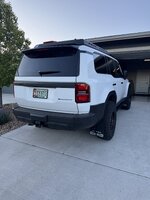
85mph interstate commute this morning and no extra noise or vibration from the rack or hidden wires... so far, so good.

IMG_0071.jpeg
IMG_0072.jpeg
IMG_0073.jpeg


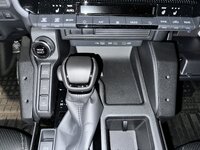
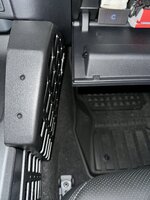
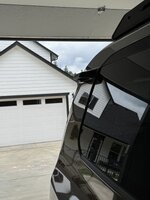
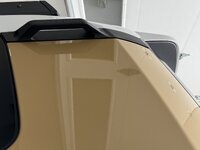
Finished wiring and switch installation...
IMG_0075.jpeg
 
Last edited:
Finally got my RRW wheels with Ko3's installed (275/70/17), and threw on the CarTrimHome mud flaps. No lift yet, so the 33's look perfect IMO. I was concerned about the +25 offset, but in person it looks great, a bit of poke, but man does the stance look good - especially after removing the front air dam's
 

Attachments

  • IMG_2521.JPG
    IMG_2521.JPG
    336 KB · Views: 224
  • IMG_2522.JPG
    IMG_2522.JPG
    336.6 KB · Views: 243
Installed the Urnieta/Starks Off-road side handle kit. Light weight, seem to be well made. Helps get to stuff on the roof rack.

Only downside was the install. They advertise an easy, straightforward install. No drilling. BUT you have to enlarge the holes behind the old trim and then install rivet nuts that they provide so that you can screw the handles into it. The front hole on each side has a metal piece underneath it that really makes this challenging, since the rivet nut can’t be fully inserted without bending it first. Almost gave up a few times!


Attachments

  • IMG_5174.jpeg
    IMG_5174.jpeg
    178.4 KB · Views: 209
  • IMG_5175.jpeg
    IMG_5175.jpeg
    225.9 KB · Views: 175
  • IMG_5176.jpeg
    IMG_5176.jpeg
    138.2 KB · Views: 150
  • IMG_5177.jpeg
    IMG_5177.jpeg
    152.5 KB · Views: 160
  • IMG_5178.jpeg
    IMG_5178.jpeg
    128.6 KB · Views: 160
Installed the Urnieta/Starks Off-road side handle kit. Light weight, seem to be well made. Helps get to stuff on the roof rack.

Only downside was the install. They advertise an easy, straightforward install. No drilling. BUT you have to enlarge the holes behind the old trim and then install rivet nuts that they provide so that you can screw the handles into it. The front hole on each side has a metal piece underneath it that really makes this challenging, since the rivet nut can’t be fully inserted without bending it first. Almost gave up a few times!

Looks great!
 
Nice.

I agree it seems misleading when vendors claim no drilling when hole enlargement is required. I guess we have to filter by no modification required.
 
Fitcamx & DV8 Offroad center console molle panels. Both were incredibly easy to install.
nice. would you mind taking a photo from above that show the top of the console and also how much space is between the panels and the glove box and driver side?
 
Bull bar on the 1st addition. Mounting Baja 4’s on it once the mounts come in. Thinking about removing the roof rack since I haven’t used since purchased 1 year ago and want to improve gas mileage. Celebrating my 250’s first b day this week.
 
Bull bar on the 1st addition. Mounting Baja 4’s on it once the mounts come in. Thinking about removing the roof rack since I haven’t used since purchased 1 year ago and want to improve gas mileage. Celebrating my 250’s first b day this week.
Photos will speak more than words ;)
 
New Shoes and Socks. KO3s 285 75/17. Raceline Rogue wheels. +35 offset. No rubbing so far and i don't think ill have any.
 

Attachments

  • 20250523_185153.jpg
    20250523_185153.jpg
    624.1 KB · Views: 168
  • 20250523_185519.jpg
    20250523_185519.jpg
    384.8 KB · Views: 159
  • 20250523_184913.jpg
    20250523_184913.jpg
    557 KB · Views: 124
  • 20250523_184931.jpg
    20250523_184931.jpg
    544.8 KB · Views: 194
I didn’t like the Black Rhino center caps of the Stadium wheels I got, which on our lug pattern are designed to fit the stock TOYOTA center caps… but I guess on the +35 offset, they don’t… I think they forgot to say that on their website. So I made my own. 3D printed with a TOYOTA deboss, then printed a TOYOTA inlay, which I painted with a color match touch-up paint from scratcheshappen.com in trail dust color. I’m happy with how they turned out..
IMG_3745.jpeg
IMG_3748.jpeg
IMG_3753.jpeg
 
I didn’t like the Black Rhino center caps of the Stadium wheels I got, which on our lug pattern are designed to fit the stock TOYOTA center caps… but I guess on the +35 offset, they don’t… I think they forgot to say that on their website. So I made my own. 3D printed with a TOYOTA deboss, then printed a TOYOTA inlay, which I painted with a color match touch-up paint from scratcheshappen.com in trail dust color. I’m happy with how they turned out.. View attachment 37629View attachment 37630View attachment 37631
Those look Great!
 
Was able to track down some OEM running boards for my wife's LC and picked them up this morning and just installed them. Big thanks to @FrankMk25226 for them. Way easier to put on than my rock rails were simply because of weight lol.
 

Attachments

  • IMG_20250524_111807999.jpg
    IMG_20250524_111807999.jpg
    633.1 KB · Views: 116
Nice. Hadn't even thought about the panels.

Did you swap them for a black version or are the silver just covers that can be removed?
 
Back
Top