Upgrading speakers on 1958

I'm not able to recommend an amp. Stuff like this (and a lack of time) is why I'll wind up leaving it to a pro installer. I do know the estimate I got involved JL Audio speakers, and a JL Audio amp and processing unit (that facilitated the communication between the head unit and the amp).

Home audio is more my jam. Car audio? Not as much.
Same here, I’m more of a tube guy - Conrad Johnson…
 
I am installing the Infinity DSP6840 ($350) (same as JBL DSP4860) which provides 40w x 8 channels and includes DSP tuning. So far the project is proceeding smoothly, if slowly. Different stages have needed unforeseen new small parts, tools, or knowledge/skill that pause the work until ready. It is taking multiple sessions as it's my first time doing this kind of work in a long while.

The Beatsonic BH10 wiring harness was crucial to simply and safely integrate with head unit and door speaker factory wiring. I caution such an install without a aftermarket wiring harness to plug in/out.

The 8 channels will power JL Audio 4 doors, 2 dash corners, 1 center dash, and then give input to an underseat powered sub JBL BassPro SL2. A Windows laptop then tunes all the speakers with time alignment, crossovers, and cabin acoustics EQ tuning. Should sound quite good. I keep reading how DSP levels up the sound quality.

The amp will be on a 30A fuse running at its 4 ohms lower wattage.

It's a fairly big job, a trusted pro could be good, an unreliable installer could damage things with electronics, the project can be enjoyable if there's time to not rush and be patient with progress slowdowns.

When completed, I can share results, materials, and methods.
Sounds great! Thank you for sharing and I look forward to your summary. I’ll have to check out the Beats harness. Unfortunately, the Beats Encore amp is rated between 4-8 ohms. On a 1958, we are pushing 2.6 ohms with the OEM dashboard and front door speakers. The parallel wiring drops the overall ohms. With 4.0 ohm dashboard speakers and 4.0 door speakers, the ohms drop to 2.0. We need an amp that is rated for 2-4 ohms. I’m trying to find out the ohm rating for the head unit. Again, thanks for sharing!
 
Sounds great! Thank you for sharing and I look forward to your summary. I’ll have to check out the Beats harness. Unfortunately, the Beats Encore amp is rated between 4-8 ohms. On a 1958, we are pushing 2.6 ohms with the OEM dashboard and front door speakers. The parallel wiring drops the overall ohms. With 4.0 ohm dashboard speakers and 4.0 door speakers, the ohms drop to 2.0. We need an amp that is rated for 2-4 ohms. I’m trying to find out the ohm rating for the head unit. Again, thanks for sharing!

The Infinity DSP 6840 amp is working and powering the corner dash and 4 doors and sounds excellent.

Before the amp, four JL Audio door speakers with only the factory head unit sounded significantly clearer and fuller than six stock speakers. The amp raised power from ~12.5w to 40w per channel amplifying and expanding the improvement. Dash corner speakers are back in action with JL C2-350x and lift the "sound stage."

The DSP software is easy to use and provides expansive control. So far, I have only done crossovering. I am giving time between DSP changes to hear and more appreciate the improvements. The sub install is planned for the weekend.

The software has a speaker clipping indicator to detect any distortion to guide the setting of gain. No clipping reported at high (max not tested) volume. That includes the four door speakers that have the factory underseat EQ unit wired between the speakers and amp. I plan to do more testing with those (software allows single speaker isolation) for deeper check of any distortion at higher volumes. So far, the 40w @ 4 ohms is producing clean, undistorted output after passing through the factory EQ unit, even with a high gain setting and loud volume. Higher wattage amps are expected to damage the EQ at some unknown point of higher watts/ohms/amps.

The center dash location is more shallow than the corners. Even the cf-350mt did not fit. I haven't found a shallow 3.5" that has frequency range to cover most of the vocal range and seems a good match to the JL speaker array. The wire is already in place and ready if one is found.

One imperfection with installing new corner dash speaker wire is (to avoid parallel wiring electrical changes and to have distinct speaker DSP control) I did not find a fully internal route I thought I was capable of installing without undue risk of mechanical mistakes/damage. Instead, I routed the two wires out of the center dash grill, then on top of the dash straight to the windscreen, where it again goes under the dash. For UV/heat protection of those exposed speaker wires there are many options. I have settled on wrapping the wires in a UV/heat resistant braided sleeve, maybe corrugated split loom, and the substantial CoverCraft dash cover which will reduce temperatures for the entire dash area. All dash speakers have much more solar exposure than other areas. The higher heat exposure is a significant issue , but also easily replaceable if/when needed by Posi-lock splicing new wire at the point under the center dash grill. If anyone finds an accessible deeper, more protected wiring route, that could be changed later.

I can share a materials and methods list later.
 
Last edited:
Upgraded sound system on 1958 gets better and better with DSP tuning. Very good sound. Massive transformation.

Components
  • Infinity DSP6840 (same as JBL DSP4086)
  • JL Audio C2-350x dash, C2-690tx front doors, C2-650x rear doors (speakers according to taste). Center dash looks to fit Hertz 87.3.
  • JBL Basspro SL2. (Confirmed snug fit under passenger seat, the Kicker underseat subs don't.)
Wiring and amp install described below. There's a good door speaker install on YouTube, and other posts for the dash.

Be careful with electricity, detach negative lead from battery when needed.

Headlamp very helpful with interior and wiring work.
Interior trim comes away surprisingly easily, very well designed. Tools and gentle and firm pulls/tugs should remove them all. I did over-pull the left kick panel, which has two parts, and did slight damage to some clips.

Trim removal tools
Amazon.com
Extra trim clips. I used several of the first kind, none of the second.
Amazon.com
Amazon.com

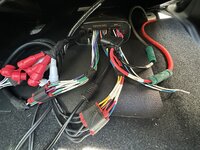
1. Interface with factory head unit and speaker wiring. One end plugs into head unit sound output, other end plugs into factory speaker harness. Cutting midway and splicing sends input to amp, and then powers 4 factory speaker circuits with amp output. This harness receives all the cutting/splicing leaving the factory wiring entirely untouched. I figure the ideal place to cut is right just near where those side wires split off to give max wire length to work with. I clipped off the speaker connectors in the diagram and Posi-lock connected there. The unused exposed wire tips were wrapped securely in electrical tape to insulate/isolate.
Screenshot 2025-05-22 at 4.03.37 PM.png
Screenshot 2025-05-22 at 4.04.08 PM.png

Beat-Sonic BH10 SPEAKER HARNESS FOR TOYOTA 10-PIN CONNECTOR

A quality pair of wire cutter/stripper/crimper well worth the few dollars than a cheap pair.
Amazon.com

2. Signal to and from amp under driver's seat
"9-wire" carries input signal from head unit to amp and a second length will brings amped signal back to the other half of BH10 harness connected to the four factory speaker circuits I used for the four doors.
https://www.crutchfield.com/p_007CSW9W20/Crutchfield-CSW9W-20-Speaker-Wire.html

The wires were fed from behind the head unit down center console on the driver's side. With the driver's seat unbolted and tilted back (no connectors need to come off), the wires then go behind the carpet behind the kick panel area and then come out the an opening under the seat where the amp will be.

18-awg speaker wire for corner dashes, center dash, and sub.
https://www.crutchfield.com/p_007CSW18/Crutchfield-Speaker-Wire-18-gauge.html
  • Dash speaker wires are easily routed behind side dash trim, door sill, under carpet to amp. On passenger side, it routes down behind side trim, under glove box and carpet, then across center console, under carpet to amp.
  • Sub wire (and power) pass under carpets through the center console behind the kick panels.

After routed through the console, the two 9-wires connect to the 8 BH10 input signal wires and 8 BH10 to-factory-speaker-harness wires. All 8 wires are color coded and matching.
Posi-Lock 18-25 ga line connectors were a huge help after an unsatisfactory crimping effort. The Posi-locks also provide a more secure connection.
8x2 = 16 Posi-locks needed behind dash.
Amazon.com

9-wire/Posi-Lock/BH10 wiring was then secured with harness fabric tape.
Amazon.com

Amp input 9 wire direct connects to amp's supplied connectors.

Amp for output needs 16 Posi-locks. (8 channels x 2 per)
Amazon.com

EZ drill/cut plastic plate to secure the amp and its wiring. Looks to also improve cooling, and definitely directs the underseat heating vent away from the amp area to the rear.
Amazon.com
Heavy duty velcro for attach to carpet.
Amazon.com

3. Grounding and powering amp and sub.
8-awg wiring kit for amp
https://www.crutchfield.com/p_007CK8/Crutchfield-CK8-Amp-Wiring-Kit.html
10-awg wiring kit for sub
https://www.crutchfield.com/p_007CK10/Crutchfield-CK10-Amp-Wiring-Kit.html

Grounding bolt was placed in factory hole in the B pillar. Unbolting the bottom of the seat belt and door sills reveals the spot from the rear seat view. See the sanded oval, that is an unused spot where I bolted the ground wire. Needed to also unbolt the seat belt at another bolt to access behind to wrench hold the nut while tightening the bolt head with ratchet. The seatbelt ratchet mechanism can lock up if moved abruptly, so good to draw out several feet of belt before hand, secure in cargo pocket behind front seat, and move the ratchet unit gently.

IMG_3277.JPG

Grounding bolts
Amazon.com
Star lock washers
Amazon.com
Dielectric grease after ground secured to protect metal.

2 Posi-lock 6-8 ga. for amp power and ground wires.
Amazon.com

The amp and sub power cables went under the carpet in front of the left rear driver seat bolt, then under B-billar, and door trim. The cargo area large trim was able to, without removing, lift out enough to route the power line direct to the battery after removing the rear seatbelt bolt, cargo cup holders, and the vent below that. A straightened wire coat hanger was helpful for this longer reach to carry the wire through. Fuses were installed by to the battery and zip tied and taped to the metal plate under the battery. All accessible behind battery hatch.
Wire ferrules useful for fuse installs
Amazon.com

Sub needs spade terminals
Gardner Bender 12 - 10 AWG #8 - 10 Stud Size Spade Terminals, Yellow (15-Pack) 15-116 - The Home Depot

2 Posi-locks needed to connect audio input to sub
Amazon.com

Other tools used:
Nitrile gloves for secure grip
Wire cutter for 9 wire, maybe the Klein cutter/stripper/crimper could have done it...
1/4 and 3/8 socket sets.
T50 Torq socket to unbolt and tilt back front seats.
Screwdrivers, needlenose, adjustable wrench
Zip ties, higher quality electrical tape,
Amazon.com
Wire harness fabric tape
Amazon.com
 

Attachments

  • IMG_3313.JPG
    IMG_3313.JPG
    441 KB · Views: 13
Last edited:
Upgraded sound system on 1958 gets better and better with DSP tuning. Very good sound. Massive transformation.

Components
  • Infinity DSP6840 (same as JBL DSP4086) on sale thru 5/25 $350
  • JL Audio C2-350x dash, C2-690tx front doors, C2-650x rear doors (speakers according to taste)
  • JBL Basspro SL2. (Confirmed fit under passenger seat, not installed yet, the Kicker underseat subs don't fit.)
Wiring and amp install described below. There's a good door speaker install on YouTube, and other posts for the dash.

Be careful with electricity, detach negative lead from battery when needed.

Headlamp very helpful with interior and wiring work.
Interior trim comes away surprisingly easily, very well designed. Tools and gentle and firm pulls/tugs should remove them all. I did over-pull the left kick panel, which has two parts, and did slight damage to some clips.

Trim removal tools
Amazon.com
Extra trim clips. I used several of the first kind, none of the second.
Amazon.com
Amazon.com

1. Interface with factory head unit and speaker wiring. One end plugs into head unit sound output, other end plugs into factory speaker harness. Cutting midway and splicing sends input to amp, and then powers 4 factory speaker circuits with amp output. This harness receives all the cutting/splicing leaving the factory wiring entirely untouched. I figure the ideal place to cut is right just near where those side wires split off to give max wire length to work with. I clipped off the speaker connectors in the diagram and Posi-lock connected there. The unused exposed wire tips were wrapped securely in electrical tape to insulate/isolate.
View attachment 37433View attachment 37434
Beat-Sonic BH10 SPEAKER HARNESS FOR TOYOTA 10-PIN CONNECTOR

A quality pair of wire cutter/stripper/crimper well worth the few dollars.
Amazon.com

2. Signal to and from amp under driver's seat
"9-wire" carries input signal from head unit to amp and a second length will brings amped signal back to the other half of BH10 harness connected to the four factory speaker circuits.
https://www.crutchfield.com/p_007CSW9W20/Crutchfield-CSW9W-20-Speaker-Wire.html

The wires were fed from behind the head unit down center console on the driver's side. With the driver's seat unbolted and tilted back (no connectors need to come off), the wires then go behind the carpet behind the kick panel area and then come out the existing opening under the seat where the amp will be.

18-awg speaker wire for corner dashes, possible center dash, and sub.
https://www.crutchfield.com/p_007CSW18/Crutchfield-Speaker-Wire-18-gauge.html

After routed through the console, the two 9-wires connect to the 8 BH10 input signal wires and 8 BH10 to-factory-speaker-harness wires. All 8 wires are color coded and matching.
Posi-Lock 18-25 ga line connectors were a huge help after an unsatisfactory crimping effort. The Posi-locks also provide a more secure connection.
8x2 = 16 Posi-locks needed behind dash.
Amazon.com

9-wire/Posi-Lock/BH10 wiring was then secured with harness fabric tape.
Amazon.com

Amp input 9 wire direct connects to amp's supplied connectors.

Amp for output needs 16 Posi-locks. (8 channels x 2 per)
Amazon.com

EZ drill/cut plastic plate to secure the amp and its wiring. Looks to also improve cooling, and definitely directs the underseat heating vent away from the amp area to the rear.
Amazon.com

3. Grounding and powering amp and sub.
8-awg wiring kit for amp
https://www.crutchfield.com/p_007CK8/Crutchfield-CK8-Amp-Wiring-Kit.html
10-awg wiring kit for sub
https://www.crutchfield.com/p_007CK10/Crutchfield-CK10-Amp-Wiring-Kit.html

Grounding bolt was placed in factory hole in the B pillar. Unbolting the bottom of the seat belt and door sills reveals the spot from the rear seat view. See the sanded oval, that is an unused spot where I bolted the ground wire. Needed to also unbolt the seat belt at another bolt to access behind to wrench hold the nut while tightening the bolt head with ratchet.
View attachment 37439
Grounding bolts
Amazon.com
Star lock washers
Amazon.com
Dielectric grease after ground secured to protect metal.

2 Posi-lock 6-8 ga. for amp power and ground wires.
Amazon.com

2 Posi-lock 10-12 ga. for sub
Amazon.com

The amp and sub power cables went under the carpet in front of the left rear driver seat bolt, then under B-billar, and door trim. The cargo area large trim was able to lift up enough to route the power line direct to the battery after removing the rear seatbelt bolt, cargo cup holders, and the vent below that. A straightened wire coat hanger was helpful for this longer reach to carry the wire through. Fuses were installed by to the battery and zip tied and taped to the metal plate under the battery. All accessible behind battery hatch.
Wire ferrules useful for fuse installs
Amazon.com

Sub looks to need these terminals
Gardner Bender 12 - 10 AWG #8 - 10 Stud Size Spade Terminals, Yellow (15-Pack) 15-116 - The Home Depot

Other tools used:
Nitrile gloves for secure grip
Wire cutter for 9 wire, maybe the Klein cutter/stripper/crimper could have done it...
1/4 and 3/8 socket sets.
T50 Torq socket to unbolt and tilt back front seats.
Screwdrivers, needlenose, adjustable wrench
Zip ties, higher quality electrical tape,
Amazon.com
Wire harness fabric tape
Amazon.com

I can share a few more photos, but didn't take many while focusing on the work.
Nice write up! I’m sure the system sounds amazing. By chance, did you see an ohm rating on the head unit?
 
Great write up.

How is the amp secured? Will post a picture?
Did you run power from the battery to the amp?
What model LC do you have?
Is there a factory EQ somewhere that I don’t know about? It sounds like you bypassed the factory EQ.

How are you going to secure the sub?
 
Upgraded sound system on 1958 gets better and better with DSP tuning. Very good sound. Massive transformation.

Components
  • Infinity DSP6840 (same as JBL DSP4086) on sale thru 5/25 $350
  • JL Audio C2-350x dash, C2-690tx front doors, C2-650x rear doors (speakers according to taste)
  • JBL Basspro SL2. (Confirmed fit under passenger seat, not installed yet, the Kicker underseat subs don't fit.)
Wiring and amp install described below. There's a good door speaker install on YouTube, and other posts for the dash.

Be careful with electricity, detach negative lead from battery when needed.

Headlamp very helpful with interior and wiring work.
Interior trim comes away surprisingly easily, very well designed. Tools and gentle and firm pulls/tugs should remove them all. I did over-pull the left kick panel, which has two parts, and did slight damage to some clips.

Trim removal tools
Amazon.com
Extra trim clips. I used several of the first kind, none of the second.
Amazon.com
Amazon.com

1. Interface with factory head unit and speaker wiring. One end plugs into head unit sound output, other end plugs into factory speaker harness. Cutting midway and splicing sends input to amp, and then powers 4 factory speaker circuits with amp output. This harness receives all the cutting/splicing leaving the factory wiring entirely untouched. I figure the ideal place to cut is right just near where those side wires split off to give max wire length to work with. I clipped off the speaker connectors in the diagram and Posi-lock connected there. The unused exposed wire tips were wrapped securely in electrical tape to insulate/isolate.
View attachment 37433View attachment 37434
Beat-Sonic BH10 SPEAKER HARNESS FOR TOYOTA 10-PIN CONNECTOR

A quality pair of wire cutter/stripper/crimper well worth the few dollars.
Amazon.com

2. Signal to and from amp under driver's seat
"9-wire" carries input signal from head unit to amp and a second length will brings amped signal back to the other half of BH10 harness connected to the four factory speaker circuits.
https://www.crutchfield.com/p_007CSW9W20/Crutchfield-CSW9W-20-Speaker-Wire.html

The wires were fed from behind the head unit down center console on the driver's side. With the driver's seat unbolted and tilted back (no connectors need to come off), the wires then go behind the carpet behind the kick panel area and then come out the existing opening under the seat where the amp will be.

18-awg speaker wire for corner dashes, possible center dash, and sub.
https://www.crutchfield.com/p_007CSW18/Crutchfield-Speaker-Wire-18-gauge.html

After routed through the console, the two 9-wires connect to the 8 BH10 input signal wires and 8 BH10 to-factory-speaker-harness wires. All 8 wires are color coded and matching.
Posi-Lock 18-25 ga line connectors were a huge help after an unsatisfactory crimping effort. The Posi-locks also provide a more secure connection.
8x2 = 16 Posi-locks needed behind dash.
Amazon.com

9-wire/Posi-Lock/BH10 wiring was then secured with harness fabric tape.
Amazon.com

Amp input 9 wire direct connects to amp's supplied connectors.

Amp for output needs 16 Posi-locks. (8 channels x 2 per)
Amazon.com

EZ drill/cut plastic plate to secure the amp and its wiring. Looks to also improve cooling, and definitely directs the underseat heating vent away from the amp area to the rear.
Amazon.com

3. Grounding and powering amp and sub.
8-awg wiring kit for amp
https://www.crutchfield.com/p_007CK8/Crutchfield-CK8-Amp-Wiring-Kit.html
10-awg wiring kit for sub
https://www.crutchfield.com/p_007CK10/Crutchfield-CK10-Amp-Wiring-Kit.html

Grounding bolt was placed in factory hole in the B pillar. Unbolting the bottom of the seat belt and door sills reveals the spot from the rear seat view. See the sanded oval, that is an unused spot where I bolted the ground wire. Needed to also unbolt the seat belt at another bolt to access behind to wrench hold the nut while tightening the bolt head with ratchet.
View attachment 37439
Grounding bolts
Amazon.com
Star lock washers
Amazon.com
Dielectric grease after ground secured to protect metal.

2 Posi-lock 6-8 ga. for amp power and ground wires.
Amazon.com

2 Posi-lock 10-12 ga. for sub
Amazon.com

The amp and sub power cables went under the carpet in front of the left rear driver seat bolt, then under B-billar, and door trim. The cargo area large trim was able to lift up enough to route the power line direct to the battery after removing the rear seatbelt bolt, cargo cup holders, and the vent below that. A straightened wire coat hanger was helpful for this longer reach to carry the wire through. Fuses were installed by to the battery and zip tied and taped to the metal plate under the battery. All accessible behind battery hatch.
Wire ferrules useful for fuse installs
Amazon.com

Sub looks to need these terminals
Gardner Bender 12 - 10 AWG #8 - 10 Stud Size Spade Terminals, Yellow (15-Pack) 15-116 - The Home Depot

Other tools used:
Nitrile gloves for secure grip
Wire cutter for 9 wire, maybe the Klein cutter/stripper/crimper could have done it...
1/4 and 3/8 socket sets.
T50 Torq socket to unbolt and tilt back front seats.
Screwdrivers, needlenose, adjustable wrench
Zip ties, higher quality electrical tape,
Amazon.com
Wire harness fabric tape
Amazon.com

I can share a few more photos, but didn't take many while focusing on the work.
Thanks for sharing! I wish those of us in Australia had access to Crutchfield. I am curious what the thinking is selected the 6.5" for the rear doors over the 6x9's?
 
Didn't see ohm rating on head unit. Presumably it's stable down to 2.67 at least for the front door/corner dash circuit.
Thank you for the follow up. I wonder if it is safe to assume it is safe down to 2 ohms? A rating of 2.6 would be odd. I’m still on the fence regarding swapping out the dashboard speakers for 4 ohms.
 
Great write up.

How is the amp secured? Will post a picture?
Did you run power from the battery to the amp?
What model LC do you have?
Is there a factory EQ somewhere that I don’t know about? It sounds like you bypassed the factory EQ.

How are you going to secure the sub?
Amp is tiny bolted to 1/16" thick plastic plate. The plate hook is heavy duty velcroed to carpet. (I'll add that link to the write up). Seems secure, no moving. Could add more velco if needed. No Velcro placed behind the floor heating vent so that hot air goes easy away into the cabin. The plastic actually has a bit of lift there and space underneath for air flow.

Power run from battery, all under trim then carpet, to amp. Sub power line follows same route continuing under carpet through lower center console under passenger carpet then out to sub. I may cut a carpet hole there for a direct path.

The sub fits pretty snug all by itself. I think four substantial corner tabs of hook velcro would be solid. The sub could not slide under the seat with a 1/16" plastic plate, but perhaps when I lift and tilt the seat up, it will fit that way. It looks sure at least some partial cover plastic plate will fit in order to direct the floor heating vent out past the sub.

The factory EQ is under the driver's seat carpet. I could see it barely, but didn't remove enough carpet to get a full look. Bypassing it was considered, but a Crutchfield tech who sounded knowledgeable, keen to help, and studied the question for a good while, offered high confidence that 40w per channel would not overload it, I decided to not touch it. Now playing, the there is no clipping, distortion, or sign of overload. The DSP software also has a clipping indicator which has always lit safe good green.

I have the 1958 trim. The 10 speaker trim has an external amp, as does the JBL of course. Attached below are technical diagrams of the ANC for all trims, which conveniently show audio components. Also attached is an impressively hard to read wiring diagram for the 1958.

I can post some post-install photos prob this weekend.
 

Attachments

  • Act Noise Control Sys (except 6 Speakers)_ PARTS LOCATION.pdf
    692.1 KB · Views: 15
  • Act Noise Control Sys (for 6 Speakers)_ PARTS LOCATION.pdf
    414.9 KB · Views: 14
  • Audio System (8 Inch Display) (6 Speakers), Navigation System (8 Inch Display), Rear View Moni...pdf
    6.8 MB · Views: 25
Thank you for the follow up. I wonder if it is safe to assume it is safe down to 2 ohms? A rating of 2.6 would be odd. I’m still on the fence regarding swapping out the dashboard speakers for 4 ohms.
Perhaps something on the head unit is visible front simply removing the dash grill? The dash trim does come off far easier that i expected to take a full look. I don’t much experience with amps, but the dozen or so i studied all were 4 or 2 ohm rated. Perhaps toyota chose an 8 ohm dash speaker to lower its volume due to proximity and not for an electrical consideration.

When inputed the known system facts to Grok big word processor, it reported that amps and head units are generally either 4 or 2 ohm stable.
Thank you so much! By default, it must be 2 ohm stable. We know the system is 2.6 ohms. Great job on the rewiring and install.
 
I’m sad to read you couldn’t run wires from the dash speakers to the headunit. You have basically done what I want to do. I was going to get a separate DSP and Amp but it sounds like yours does everything I want like signal summing, and time correction. It is small too.

I had not planned on coaxials in the doors, just 6.5 inch woofers. Otherwise you did exactly what I have been planning.

Do the JL 3.5’s fit? Crutchfueld website says they do not.
 
Last edited:
I’m sad to read you couldn’t run wires from the dash speakers to the headunit. You have basically done what I want to do. I was going to get a separate DSP and Amp but it sounds like your does everything want like signal summing, and time correction. It is small too.

I had not planned on coaxials in the doors, just 6.5 inch woofers. Otherwise you did exactly what I have been planning.

Do the JL 3.5’s fit? Crutchfueld website says they do not.
The JL C2-350x do fit in corner dash, with homemade bracket adaptor. New, better wiring was found and is easily routed behind removed side trim of the dash.

Having amp and DSP in one small unit from reputable Harmon Kardon (Infinity & JBL) is a big plus. 40w is at the upper range of recommended power for many 3.5" dash speakers including the C2 JL-350x. 40w passes through the factor EQ without overpowering it (so far so good) and needing to bypass. 40w is nearing the ideal power for the JL C2 door speakers 55-60w and a vast improvement over factory 10-15w. Ideal powering door speakers and dash speakers would require two different amps, and an external DSP unit to manage them. That's a lot under the seat, plus the factory EQ concerns, and around $1000 more cost.
 
Last edited:
From what I understand it's 4 ohm. I dont think that is the solution for me, I so went with a PAC AP4-TY14 running to an Alpine PXE C80-88.
The Beats amp isn’t a viable solution for the 6 speaker 1958 model. The 1958 operates at 2.67 ohms with the OEM speakers. If you replace the dashboard speakers with 4 ohms, the resistance drops to 2 ohms. You need an amp that supports 2-4 ohms. Toyota wired the dashboard and front door speakers in parallel. This makes upgrading the system more of a challenge.
 
JBL BassPro SL2 went into today and is working. Fits very snug under the passenger's seat. With moderate initial bass settings and only crossover tuning, it made a substantial add to music that has that low end. The Infinity DSP4086 tuning software allows multiple profile scenarios with different settings, so the comparison of prior-door/dash speakers with door/dash/sub/recrossed-over can be heard side by side with a one-click comparison. The new speakers and amp were very large improvements, the sub adds new low end sound, and reportedly relieves the door speakers for finer mid bass.

EQ tuning later looks to optimize all that. Found a $23 calibrated mic Dayton Audio iMM-6 Calibrated Measurement Microphone

I did have an seatbelt retractor locked problem when placing the amp ground on B-pillar chassis, so good to be careful there. The next time I removed one, I pulled a couple feet of seatbelt out and secured in the back-of-seat pocket before moving the retractor.
 
Last edited:
I’m sad to read you couldn’t run wires from the dash speakers to the headunit. You have basically done what I want to do. I was going to get a separate DSP and Amp but it sounds like yours does everything I want like signal summing, and time correction. It is small too.

I had not planned on coaxials in the doors, just 6.5 inch woofers. Otherwise you did exactly what I have been planning.

Do the JL 3.5’s fit? Crutchfueld website says they do not.
Well, your comment motivated me to take another look at the corner dash speaker wire routing more directly away from UV/heat. A much better route was found. A piece of side trim comes reveals open space very close to the corner dash. From there the wire goes down side trim, door sill, under carpet to amp. I thank you as those speaker wires will be far away from the dash UV/heat. A dash cover still looks like a good idea to reduce temps for the speakers and its other benefits.

Same on passenger's side, then wire back below glovebox, just under the top of the carpet, and then through the center console. I'll update earlier posts..


IMG_3312.JPG
 
Last edited:
Back
Top