🛠️ What Have You Done To Your LC250 Today?

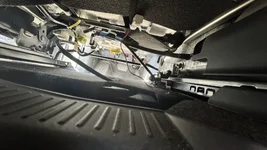
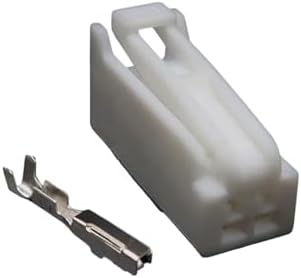
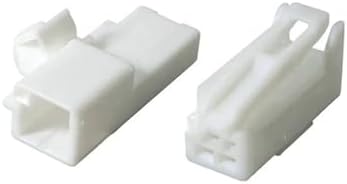
I’m installing footwell lighting for the rear seats. Noticed this unused plug in the center console area. Looked up some images of the premium trim and they have a blank for this spot too. Any idea what’s it for?
You could probe with a meter. Look for battery and ground. That should be all you need to tap into. Or just seek battery if you can ground your item to chassis metal
 
You could probe with a meter. Look for battery and ground. That should be all you need to tap into. Or just seek battery if you can ground your item to chassis metal
I already have the lights all set up and ready to go. Good idea on using a meter to test the plug...part of me is wondering if its for the heated rear seats for the premium trims.
 
I already have the lights all set up and ready to go. Good idea on using a meter to test the plug...part of me is wondering if its for the heated rear seats for the premium trims.
If it’s for the console cooler or seat heaters you might want to chase the source fuse out of an abundance of caution. High current draw loads = high throughput fuses. If your lights are solid state you’ll be fine though.
 
If it’s for the console cooler or seat heaters you might want to chase the source fuse out of an abundance of caution. High current draw loads = high throughput fuses. If your lights are solid state you’ll be fine though.
In the spring i installed a pair from sticker fab and it came with a y connector for a harness behind the glove box. This time I just bought a cheaper set off aliexpress for the rear seats and ended up splicing into the cable that I had set up. Everything seems to be working in order and will post a pic at night. This random plug threw me off as i was pulling panels.
 
Last edited:
I’m installing footwell lighting for the rear seats. Noticed this unused plug in the center console area. Looked up some images of the premium trim and they have a blank for this spot too. Any idea what’s it for?
The white connector is for a module that's bolted to the upper L/H corner of the rear of the console box, behind the trim panel (does not appear to be in your picture). I assume that module is for the cool box.

Additionally, there's a switch for the cool box that's located on the forward end of the console box.

(edit) which lights did you select for the rear footwell?
 
Last edited:
The white connector is for a module that's bolted to the upper L/H corner of the rear of the console box, behind the trim panel (does not appear to be in your picture). I assume that module is for the cool box.

Additionally, there's a switch for the cool box that's located on the forward end of the console box.

(edit) which lights did you select for the rear footwell?
Oh, interesting. I’ve read a lot of people complaining about that cool box, but it’s good to know that I have the option if I wanted one on my 1958. I went with these cheap ones for $11, after getting annoyed a few weeks back when I dropped something in the rear. Underneath the seat it already has a clip for the wires I just shoved it into that with enough slack to move the chairs.

Edit: the wires were a bit short to the front passenger side and extended it with some leftover wire I had from my light bar install.
 

Attachments

  • IMG_4007.webp
    IMG_4007.webp
    198.2 KB · Views: 199
  • IMG_4006.webp
    IMG_4006.webp
    321.2 KB · Views: 176
  • IMG_4011.webp
    IMG_4011.webp
    307.4 KB · Views: 233
Last edited:
In the spring i installed a pair from sticker fab and it came with a y connector for a harness behind the glove box. This time I just bought a cheaper set off aliexpress for the rear seats and ended up splicing into the cable that I had set up in the spring. Everything seems to be working in order and will post a pic at night. This random plug threw me off as i was pulling panels.
look forward to seeing it!
 
Added these front quarter panel covers. like how they fit and look, also dded a little protection.
picked these up here:

the store has a lot of cool little accessories. not a paid advertisement.
 
  • Like
Reactions: J44
  • Like
Reactions: J44
I'd also like to know where you can get these. Those two squares are apparently magnets for small rocks. I have one parking sensor wrecked by a rock and the other side was also hit by a rock less than a 1/4 inch from a parking sensor and chipped the paint off.
 
Oh, interesting. I’ve read a lot of people complaining about that cool box, but it’s good to know that I have the option if I wanted one on my 1958. I went with these cheap ones for $11, after getting annoyed a few weeks back when I dropped something in the rear. Underneath the seat it already has a clip for the wires I just shoved it into that with enough slack to move the chairs.

Edit: the wires were a bit short to the front passenger side and extended it with some leftover wire I had from my light bar install.
Thanks for the link, unfortunately I don't purchase from Ali Express or any Ali affiliated source, I know others haven't had issues, but my CC information was stolen both times I used them and was a mess getting it corrected.
 
Thanks for the link, unfortunately I don't purchase from Ali Express or any Ali affiliated source, I know others haven't had issues, but my CC information was stolen both times I used them and was a mess getting it corrected.
I use Apple Pay when I make any purchases. They mask the numbers for you. Have not had any issues using this method. If you have the Apple Card you can request new numbers on the go.

Found something similar off Amazon.
 
Interesting how these items find me these days. Almost like those Silicone Valley bastards have some algorithm. I'm a LC250 aftermarket online magnet. If it's out there it'll find me.
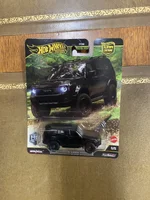
And the "special edition rare Chase" overpriced Hotwheels LCs? They just had to make a black one! :cautious:
 

Attachments

  • IMG_4615.webp
    IMG_4615.webp
    349.8 KB · Views: 274
Interesting how these items find me these days. Almost like those Silicone Valley bastards have some algorithm. I'm a LC250 aftermarket online magnet. If it's out there it'll find me.
And the "special edition rare Chase" overpriced Hotwheels LCs? They just had to make a black one! :cautious:
I have 2 of these. The wifey got one for me, and yesterday I flipped through them at walmart thinking I might see a blue one while the kids touched everything on the isle. So… now I have an open one too haha
 
I’m installing footwell lighting for the rear seats. Noticed this unused plug in the center console area. Looked up some images of the premium trim and they have a blank for this spot too. Any idea what’s it for?
Can you tell me how you’re doing this? I’ve been looking to try to do this last year. I heard the wiring harness for the kit you buy online is different (jdm)
 
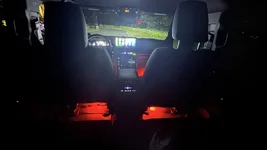
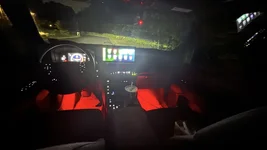
Here are the results folks. I’m pretty satisfied with how it came out. I need to Velcro the rear light further to the edge of the seat so it can throw the light more.
 

Attachments

  • IMG_4022.webp
    IMG_4022.webp
    67.4 KB · Views: 263
  • IMG_4023.webp
    IMG_4023.webp
    91.3 KB · Views: 243
Can you tell me how you’re doing this? I’ve been looking to try to do this last year. I heard the wiring harness for the kit you buy online is different (jdm)
For the front I bought a kit from StickerFab that was roughly $28. Here is a video of that install very straight forward. It seemed it was dropped shipped.

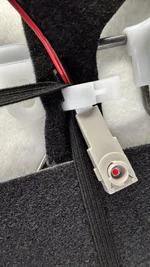
For the rear I fed the wire underneath the car seat rail. This way it won’t get snagged. Popped the rear end of the center console off. Pushed the wiring from the center of that looping it around the metal frame. Then on the right hand side I did the same thing fed the wire through the half way point and under the seat rail. This way if you are sitting behind the driver you can’t see the wiring at all.
IMG_4005.jpeg

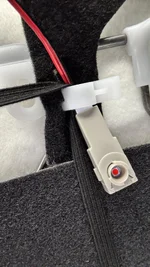
Once i clipped the bulb to the seat. Like this. Honestly not happy with where it is. I need to glue a Velcro strap to the back and move it further to the edge to cast the light better.
IMG_4007.jpeg

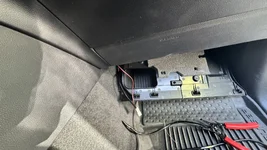
Then I cleaned up the wiring from the front passenger seat and just tucked it under this panel.
IMG_4009.jpeg


Obviously with the battery disconnected…I spliced the wiring from sticker fab kit to power the rear.
IMG_4011.jpeg


This all took maybe 30-40mins. I was moving slow to make sure I didn’t break anything. Honestly it can be done in under 30. If I’m able to do this anyone can. I’m not as talented as half the folks on this forum.
 

Attachments

  • IMG_4006.webp
    IMG_4006.webp
    321.2 KB · Views: 167
Check this out ;)
 
Supporting Vendors View all →
Rhino Rack
Back
Top Bottom