Rear recovery point options?

This is a very brief video from Dissent Offroad. Posting it here because first, it's just super beautiful scenery with snow and colors in CO I think. Second it demonstrates a rear tow hook in action. Third I think (correct me if wrong) it is a kinetic strap in action used twice by the owner of Dissent who pretty sure knows a thing or two about recoveries, and how to use this thing.

.

Kinetic ropes are the "Mac Daddy" !

For the nah-sayers out there, I have watch Matt's Off Road recovery videos where his extremely heavy wrecker put some extremely hard Kinetic yanks on several different motorhomes, which gently hopped out of the hole they were stuck in.
 
Installed Reno Billet 2” shackle receiver (recovery point) into the hitch.
I added (2) 3/4” ID o-rings to shim on the shackle’s pin to remove play & prevent noise. Took a while as the fit was tight, but they shimmed up all the slack. Just didn’t want the added clanking, and it worked and will even hold position 90 degrees from what you see in the pic. Also did the same type o-ring shim on the receiver pin.
While I was buying stuff I replaced the 2 front stock recovery points w/ billet Reno aluminum versions w/ larger openings for my soft shackles.

IMG_1138.jpeg
IMG_1127.jpeg
 
Last edited:
@LCOceans

Looks to be a strap to me, typically want to be in neutral or have very decent spin on the tires going before a kinetic yank. But kinetic is great until stuck heavily. That's when they become dangerous or when loaded up with too much energy too fast.

I'll stick with straps, too much room for error with kinetic for me.
 
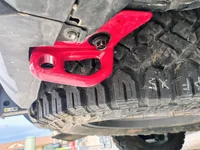
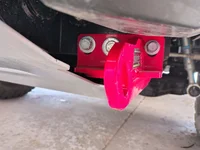
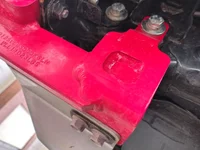
I installed a TRD 4Runner rear recovery point this evening in place of the stock tow hook. The install is super easy as attachment points are w/ 2 bolts w/ 17mm heads. I had made it a bit tight w/ our larger 275/60R20 hanging in the spare well. Could have lowered it but just used a box end wrench on the upper vertical bolt position. I used a Milwaukee carpet cutter blade to slightly trim the lower facia for the install. Overall pretty easy.

Our LC is Underground w/ blackout on the emblems (except for front & back white Toyota emblems). Overall I’ve been making an effort for most of the add-ons to be in black, so I painted the red TRD tow hook a flat black. Matches the front recovery points I installed (from longer F150/Tacoma front tow hooks) a few weeks ago. I like the subdued parts over the bright red.

IMG_1314.jpeg


IMG_1363.jpeg


IMG_1362.jpeg


IMG_1367.jpeg


IMG_1366.jpeg


IMG_1365.jpeg


IMG_1428.jpeg
 
Last edited:
Agreed, I really don’t get this quest to paint recovery points red, orange, gold etc. especially when they are going to get knocked about instantly. When mine arrive, I’ll be toning them down before fitting too.

Then I’ll have the issue of the knocks showing the red paint underneath 😱

😊😊
 
Agreed, I really don’t get this quest to paint recovery points red, orange, gold etc. especially when they are going to get knocked about instantly. When mine arrive, I’ll be toning them down before fitting too.

Then I’ll have the issue of the knocks showing the red paint underneath 😱

😊😊
Everyone has different tastes as long as reflecting their styles. Many love/like pop colors.
All my recovery points/gears are in black
 
Looks like there is a better oem option for the rear now. It's marketed towards the 4runner, but should fit our cruisers.
Part Number #PT974-89251-03
I have one on order and will test fit in a few weeks.
View attachment 55772
View attachment 55773

I just installed this, took about 10-minutes.

Only need two tools.
Razor blade (for cutting plastic)
17mm wrench (ratcheting is a bonus)

Great OEM modification to add another recovery point option.
 

Attachments

  • LC_Rear Recovery Point.webp
    LC_Rear Recovery Point.webp
    294.4 KB · Views: 114
Last edited:
For the fronts, is there also agreement on whether to bother changing the OEM recovery points?

There’s info on the strength of the OEM bolts and 3rd party recovery points, but no info on the max pull weight of the OEM point itself.

Also confusing that some 3rd party aluminum points are rated 5,000-6000 pounds and others 10,000-11,000 pounds. I think steel ones are mostly 11,000 pounds.

And the rating and material for the replacement Toyota points for the Tacoma (which apparently fit the LC) aren’t specified.

If you order recovery points that are manufactured and sold in Australia, they actually take these ratings seriously for legality. I would look to buy from companies like ARB. The front rated recovery points that shipped with my Ironman bumper are massive, they have (6) bolts securing them to the frame and probably weigh 20lbs each.

While I wouldn't be concerned at all using a forged 'tie down' point here, there is an extreme difference between legally 'rated' recovery points that are used overseas.
 

Attachments

  • LC_Front Rated Recovery Point 2.webp
    LC_Front Rated Recovery Point 2.webp
    98.5 KB · Views: 108
  • LC_Front Rated Recovery Point.webp
    LC_Front Rated Recovery Point.webp
    131.3 KB · Views: 102
Last edited:
I'm pretty sure it was only the silver piece that needed the slight trim, and only on the bottom lip. That part is easily replaceable, but is showing up at around $120...

View attachment 56971

Also the smaller hole fits a 7/8" bow shackle, but more of the bumper trim would need to be cut to use properly.
View attachment 56972
When i looked at the trim area i notice its etched with lines where the trim should be.
A Dremel cut wheel worked fine.
 
Back
Top Bottom