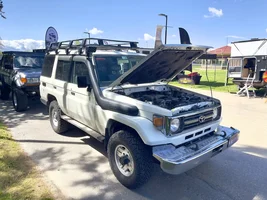
Meet Yagi my Moab prep build of a 1991 80 series (HDJ81) to date

UOA is in and no issues found up one PPM on lead is the only difference, so I'm stoked! Only 3 wear metals are present all are low (4PPM and under normal for this engine and mileage for a total of 9 vs 8 PPM wear metals.

Too many variables and lack of a statistically significant increase for the lead count to mean anything (could literally be anything or nothing at 1 PPM difference). With sustained freeway speeds, sustained long grades with hard pulls, different environments, different oil and unknown use and mileage on previous as bought oil from the other sample it appears the engine is fine and healthy!

So moving forward with a compression check followed by proper upgrades if SAT after my custom exhaust goes in next week!
 
Brake and axle rebuild in progress:

Upgrading front from 286mm to 312 mm with a thickness increase from 25mm to 32mm all Toyota parts for late model 80 series, only change up front beyond larger rotors is the backing plate.

Upgrading rear from 312mm to 336mm, same as front for changes to the disc brake portion, the majority of parts for the larger ebrake need changed out too many parts to list for the thread.

Upgrading brake booster with dual diaphragm unit made specifically for diesel applications to compensate for having a vacuum pump that can't produce allot of vacuum at low RPM, this improves brake response to pedal effort by 35%.

Everything is getting replaced minus, calipers, hardlines and master cylinder (recently replaced). Using all Terrain Tamer HD components with Koyo bearing sets that are further hardened beyond Toyota specs specifically for Terrain Tamer.

Installed the Dobinson IMS 4" extended length travel shocks a few weeks prior to finish off the suspension and had the exhaust redone in stainless and 3 V-Band joints installed to facilitate full or sectional removal when needed for easier maintenance of anything beneath the vehicle.

Findings: All four ends had issues, some previous owner installation issues and other just failures over time. 3 of the 4 had evidence of water intrusion into the hub, axle oil seal failure and hub seal failure. LSPV was improperly adjusted as evidenced by almost new brake pad thickness in the rear compared with 1mm remaining to wear indicator engagement on the front.

Before shots:
Rear
Rear R before.webp

Front:
Front R before.webp


More to come, ran into some issue and waiting parts to correct, currently about 85% done. Will finish this up with pics and info when parts arrive and I can get back to it.
 
Last edited:
Remarkable journey you’ve shared in this rebuild.
Truly spectacular work!
 
Current brake and axle progress and findings:

Rear Right axle oil seal found damaged and not fully installed by PO which led to it's early demise. Also notice the rust in the grease just in front of where the outer hub bearing rides on the spindle, water intrusion into the hub had begun as well, luckly no permanent damage to the spindle/axle occurred.


Rear L axle oil seal failure and improper installation.webp

Top down view showing where rust occured on the hub where the lock nuts, lock tab washer and thrust washer reside.

Rear L water intrustion.webp


Rear Right hub seal failure had just started leaking grease onto the ebrake, you can see the burnt rubber on the spindle from the failure. EBrake was heavily coated in grease.

Rear L inner hub oil seal failure.webp


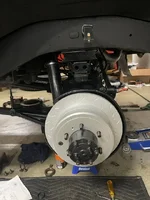
Rear right almost complete, awaiting new braided brake hose and banjo bolt: Noting notable found during this portion of rebuild other than the brake line needed replaced and uneven pad wear compared to the front from improperly adjust LSPV.

Rear R ready for caliper.webp


Front caliper before paint showing restored boots with Chemical guys VRP on the lower two vs regular cleaning on the top two pistons, awaiting replacement braided line and banjo bolt.

Caliper cylinder boot inspection.webp


Short side Trail Gear Long Field axle broken down and cleaned ready for reassembly, this was a nice surprise finding to have these axles installed and easily greaseable by removing the locking hub which puts new grease directly into the joint!

TG axle cleaned and seperated.webp


Front right cleaned up and ready for reassembly!

Front R ready for assembly.webp


Front right swivel housing, axle, rear wiper seals, tie rod installed, grease and ready for the spindle.

Front R ready for spindle.webp


New backing plates and seals installed and ready for hub and rotor.

Front R ready for hub and rotor.webp


Commence the problem: With hub and rotor installed, bearing pre-load could not be adjusted within range and only got worse when installing the free-wheeling hubs, spacer and c-clip which wouldn't fully engage.

TG wide angle clip shot.webp


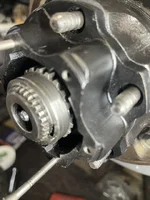
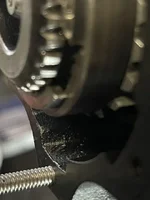
Close-up of the clip shows that's it's not fully seated into the axle groove. The lock ring and spacer should be easily rotatable by hand with the lock ring installed which it is not.

TG clip not fully engaged.webp


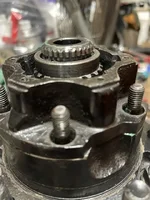
Tore it back apart to investigate more easily on the bench, this is the TG Long Field with no gasket installed at the free-wheeling hub to hub interface and the old shorter free-wheeling hub : Installed old parts to verify not a new part issue, no change, did a bunch of checking before deciding to grab an OEM axle out of the basement to compare.

TG axke flange clip 3.webp


This is OEM with a new free-wheeling hub that is .002" taller than the one removed with a gap between the mating surface showing how it should look.

OEM axle flange clip compare.webp


So the problem is the TG Long Field measures .030" shorter than an OEM specification axle where the axle/spindle/hub interface with one another and the slightly different taper where the spindle bearing rides on the axle causes the hub to ride another .006" further out on the spindle as well for a total of .036" difference which causes the lock ring to not engage in the groove. After allot of calling around to Land Cruiser experts found out this is a known issue and luckily for me they sell a kit with various thickness lock rings to account for this. Would have be nice if I could have learned that information on Trail Gears website would have saved me 2-3 days time and 4 tubes of Moly grease. Same story other side.

I'd surmise this is the reason both front sides met an early demise with seal failures and worn bearings as after talking with the PO who installed these, he encountered the same issue but continued the installation anyway. He said the bearing pre-load took some time to achieve but was good in the end. Find that pretty near impossible but here I am awaiting more parts to fix this properly.

Will post completed four corners once all parts arrive and I finish it up.
 

Attachments

  • TG wide angle clip shot.webp
    TG wide angle clip shot.webp
    38.9 KB · Views: 21
  • TG clip not fully engaged.webp
    TG clip not fully engaged.webp
    27.4 KB · Views: 21
  • TG axke flange clip 3.webp
    TG axke flange clip 3.webp
    47.1 KB · Views: 23
  • Rear R ready for caliper.webp
    Rear R ready for caliper.webp
    47.4 KB · Views: 22
  • TG clip not fully engaged.webp
    TG clip not fully engaged.webp
    27.4 KB · Views: 23
Last edited:
Holy smokes Dude you are next level.
I want you working on my truck when it breaks!
 
Few other updates showing the new headlights, not real keen on the newer school looks but sure help my tired eyes see the road at night!

Also finished my new grille to accommodate larger intercooler coming early next year.

I have a GTurbo HD-380 Titan, PDI Intercooler/transmission cooler combo and a TorFab 4" inlet/outlet panel air filter box to go in sometime in January along with rebuilding the injection pump, injectors and then tuning the new setup. This should suffice for a while unless I can get my hands on a Australian stainless snorkel!?

Planning to run around 20 PSI boost on this setup due to unknown Head studs being installed, if I pull the head later for some necessity I'll put in ARP studs to allow for 23-25PSI safely if the motor health still suggests she can take it.

Floor patching TBD to cut out some minor cancer found, donor patch panels in hand.

New grille, hard to get a good shot: I purchased the pre-cut metal and went to trimming, bonding and painting and here is the result.

IMG_5216.webp


IMG_5217.webp


Older shot showing the new headlights from TEQ Customs. These have angel eyes, demon eye in low beam and shroud lighting. The projectors are dual beam (lo/hi) on the outers and spot high beam on the inners and can switch between 3 color temperatures from white to fog and in between either by independent switch or turning off and on quickly to switch color temps. Love the function, not a fan of the look though.

IMG_4971.webp


You can get a feel from the old grille hear as well.

IMG_4970.webp
 
Last edited:
Knuckle, axle and brake rebuild mostly complete. Still have the brake booster to install, waiting on a gasket for that. E-brake fine tuning and a slight adjustment to the rear hub bearing preload which I'm also waiting on new gaskets to perform.

Road test results were positive, no more massive forward brake bias, no longer hard pulling to the left and stops much more confidently. The E-brake is better although it can't hold it on any hill 30 degrees or more or hold back the vehicle in drive at idle, currently only 1 side is properly adjusted so hopefully that will improve once some more adjustments are done. May need to remove some rear bias now that everything is no longer covered in grease as well.

IMG_5222.webp
 
Finaly all completed, got the dual diaphragm booster installed, rear bearing pre-load dialed in and e-brake will now hold me in place on a 30-degree decline while in drive with about 8 more clicks available if needed, may even hold it back in 4WD Low-range now!?

That new brake booster is a game changer, no longer wanting more from the braking system!

Been working on the mini doppelganger too.
IMG_5226.webp
 
Current brake and axle progress and findings:

Rear Right axle oil seal found damaged and not fully installed by PO which led to it's early demise. Also notice the rust in the grease just in front of where the outer hub bearing rides on the spindle, water intrusion into the hub had begun as well, luckly no permanent damage to the spindle/axle occurred.


View attachment 78248
Top down view showing where rust occured on the hub where the lock nuts, lock tab washer and thrust washer reside.

View attachment 78253

Rear Right hub seal failure had just started leaking grease onto the ebrake, you can see the burnt rubber on the spindle from the failure. EBrake was heavily coated in grease.

View attachment 78254

Rear right almost complete, awaiting new braided brake hose and banjo bolt: Noting notable found during this portion of rebuild other than the brake line needed replaced and uneven pad wear compared to the front from improperly adjust LSPV.

View attachment 78256

Front caliper before paint showing restored boots with Chemical guys VRP on the lower two vs regular cleaning on the top two pistons, awaiting replacement braided line and banjo bolt.

View attachment 78257

Short side Trail Gear Long Field axle broken down and cleaned ready for reassembly, this was a nice surprise finding to have these axles installed and easily greaseable by removing the locking hub which puts new grease directly into the joint!

View attachment 78258

Front right cleaned up and ready for reassembly!

View attachment 78261

Front right swivel housing, axle, rear wiper seals, tie rod installed, grease and ready for the spindle.

View attachment 78262

New backing plates and seals installed and ready for hub and rotor.

View attachment 78263

Commence the problem: With hub and rotor installed, bearing pre-load could not be adjusted within range and only got worse when installing the free-wheeling hubs, spacer and c-clip which wouldn't fully engage.

View attachment 78264

Close-up of the clip shows that's it's not fully seated into the axle groove. The lock ring and spacer should be easily rotatable by hand with the lock ring installed which it is not.

View attachment 78266

Tore it back apart to investigate more easily on the bench, this is the TG Long Field with no gasket installed at the free-wheeling hub to hub interface and the old shorter free-wheeling hub : Installed old parts to verify not a new part issue, no change, did a bunch of checking before deciding to grab an OEM axle out of the basement to compare.

View attachment 78267

This is OEM with a new free-wheeling hub that is .002" taller than the one removed with a gap between the mating surface showing how it should look.

View attachment 78269

So the problem is the TG Long Field measures .030" shorter than an OEM specification axle where the axle/spindle/hub interface with one another and the slightly different taper where the spindle bearing rides on the axle causes the hub to ride another .006" further out on the spindle as well for a total of .036" difference which causes the lock ring to not engage in the groove. After allot of calling around to Land Cruiser experts found out this is a known issue and luckily for me they sell a kit with various thickness lock rings to account for this. Would have be nice if I could have learned that information on Trail Gears website would have saved me 2-3 days time and 4 tubes of Moly grease. Same story other side.

I'd surmise this is the reason both front sides met an early demise with seal failures and worn bearings as after talking with the PO who installed these, he encountered the same issue but continued the installation anyway. He said the bearing pre-load took some time to achieve but was good in the end. Find that pretty near impossible but here I am awaiting more parts to fix this properly.

Will post completed four corners once all parts arrive and I finish it up.
I wish I could do stuff like you!
 
@ultane, I'm no superhuman, most anyone can do this stuff if they set their mind to it. Having the tools is another story, which isn't cheap so unless you wrench allot and have the space to store them then that might be a limiting factor for anyone.

I'll turn wrenches and do all my own maintenance and repairs until my body will no longer allow it.
 
@ultane, I'm no superhuman, most anyone can do this stuff if they set their mind to it. Having the tools is another story, which isn't cheap so unless you wrench allot and have the space to store them then that might be a limiting factor for anyone.

I'll turn wrenches and do all my own maintenance and repairs until my body will no longer allow it.
I have acquired several (5) toolboxes of tools in the last 60 years. And I gave another one away when I moved back east from Idaho. For me, it’s just knowing how to do things, the right way, the FIRST time, that worries me. I can read and study a manual, and follow properly written instructions to the “T”. But there’s always that job where you don’t know, what you don’t know. 😬
 
YAGI II almost complete, few decals and body molding belt line to finish up. Thinking I need a 250 model to round things off?

Body paint didn’t turn out very good, note to self don’t use automotive base and clears on dyed plastics as the dye is leached into the base during both layers being sprayed and is worse when spraying the clear.

IMG_5228.webp


IMG_5230.webp


IMG_5229.webp


IMG_5231.webp

IMG_5235.webp


IMG_5233.webp
 
Nice build, these things are bullet proof, they are so much more reliable than any 250. I miss my old 80...
 
Back
Top Bottom