Interior Trim Removal

While I haven't seen many gaskets or O-rings leak, I've seen enough that you may be replacing a headliner if that gland ever fails during a rainstorm or snow melt (consider I live in a very dry state as well), and it won't be covered under any warranty. The odds of a leak are near zero if you don't drill and/or have a sunroof. This happens to OEM vehicles that use premium gaskets over time with any type of overhead lighting or through the third-brake light.
Yeah, I discarded the whole "gland" idea a long time ago. That being said, there are already 12 holes in my roof from the roof rack. I did use an overly-liberal dose of RTV in and around each bolt so I'm hopeful that there won't be a leak but I do know that it's a possibility.

I would run this ^ down the front window channel, under the cowl, directly into the engine bay and you can easily route the wiring into the firewall from there on the driver side. Zero chance of a leak and if you ever get tired of having overhead lighting, it's easily removable.
Regarding the KC wire hider, I tried that with miserable results. I felt like I did everything correctly including cleaning the glass with alchohol prior to applying the adhesive but after the first rain fall it started coming un-stuck to the point that I worried about it flopping around and eventually off while on the interstate. I ended up running it down the side of the window with dabs of clear RTV to tack the wire in place. It seems to be doing the trick and you really have to be looking for it to see it.

Thanks for the input though!
 
Dvr's side trim panel removal.

Remove the rear hatch threshold
Remove the 5 storage trays (rear, R/H, L/H, L/H lower and front)
Remove the cargo floor flip up tie down points
Remove the cargo floor
Remove the rear hybrid battery trim surround (large "U" shape)
Remove the "T" anchor from the Dvr's side rear hatch pillar (gentle twist)
Remove the 10mm bolt beneath the "T" anchor
Remove the 3rd row seat belt trim panel cover (3x3 square)
Remove the 10mm bolt beneath the 3rd row seat belt trim panel cover
Remove the 2nd row dvr's side seat belt anchor bolt.

Starting at the rear vertical edge, use an "L" shaped trim panel tool and start popping the fasteners. You will need to disconnect the rear LED light connector and the fwd USB connector.

You do NOT need to remove the upper trim panels (rear hatch to window and the window to door).
You (or anyone else) wouldn't happen to have a photo of the passenger side trim piece removed would you?
 
Last edited:
You (or anyone else) wouldn't happen to have a photo of the passenger side trim piece removed would you?
I don't have any pictures, as I stopped when I realized the Pass side is where the Rear AC pieces are and there is little to no room. There was one member who removed it but I can't recall who that was.
 
Best one I could find @fftfk
Screenshot 2026-05-26 101012.webp


You can catch a glimpse of some other areas in the full video here but the scenes are quick.
 
Best one I could find @fftfk View attachment 68216

You can catch a glimpse of some other areas in the full video here but the scenes are quick.
Perfect demonstration of why insurance companies are quick to total these. "Minor" appearing damage takes tons of manhours to repair properly, even though completly doable with right skillset and equipment. Even these guys, who seem to be pros, grossly underestimated the job.
 
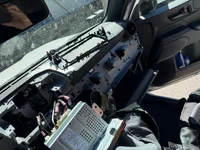
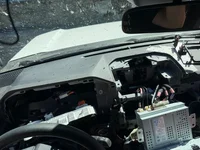
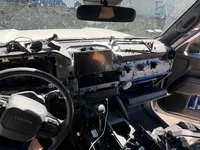
If it helps anyone this is the best video for dash removal I've found...


The instrument cluster just needs the surround unclipping and a few bolts...

After seeing this video, I need to take my center console off. Many months ago, the shady service manager told me they had to take my center console off, to replace the head unit. Obviously not necessary at all. Makes me wonder, in light of this article..
 
Last edited:
I'm no EOD Guy. Nothing humbles a man quite like a ten-minute job that has the potential to destroy an entire weekend—and maybe an iconic truck. I finally admitted something I've been fighting for a while: my hands just aren't steady enough anymore for this kind of meticulous work. The smartest tool in my toolbox now is knowing when to close it, go to work, and pay someone whose hands don't shake every time they hold a f'ing screwdriver.
 
I don't have any pictures, as I stopped when I realized the Pass side is where the Rear AC pieces are and there is little to no room. There was one member who removed it but I can't recall who that was.
@fftfk , apologies for the delay on this. EOD Guy may have been thinking of me. I took it off when doing the sound deadening. I wasn't focused on getting "archival" images of it, so unfortunately, this is the best picture I have of it:

1784602173717.webp
 
Switch panel just below the AC controls.

Uses the "arrow" style fasteners, it was a pian to figure out, but with a plastic hook trim removal tool, it pulls straight out.
I just installed mine. Didn’t have a tool so used a skinny flat head screw driver. Worked like a charm. It was a pain getting the 2 fake buttons out but did it and looks great.
 
I just installed mine. Didn’t have a tool so used a skinny flat head screw driver. Worked like a charm. It was a pain getting the 2 fake buttons out but did it and looks great.
Welcome to the asylum.
 
Here's the rear liftgate trim:
1. Start with the upper center piece around the rear camera. I think there are 6 of the white pegs:
View attachment 15772

2. Remove the sides. There are 2 yellow pegs per side. You can leave them hanging from the main panel portion
View attachment 15773

3. Remove the cover around the rear wiper motor. You need to open the rear glass to get to this one. There are 4 clips along the top, pull them out and then pull up for the 2 on the bottom corners.
View attachment 15774

4. Remove the "handle. There are 3 clips on each side. I don't know if there is a better way other than just pulling it out on one side. I did damage one of my clips though.
View attachment 15775

5. Pull the cover around the door latch straight down and then swivel it out around the 2 "hinge" clips:
View attachment 15776

6. Pull the panel holding the power latch buttons similarly to the "handle" on the other side. You'll need to swivel it and push it into the body of the liftgate or unclip the wiring.
View attachment 15777


7. Once you have all that done, the large panel is ready to be pulled off. It is only held on by several white pegs. Just start on one sid and work your way around. Sorry, no picture of the panel below is what it looks like when it's off. Ignore the white wire and gaping hole where the sub was mounted. I was experimenting with getting a signal for a powered sub.

View attachment 15778
1789499192850.webp

Does anyone know the part number / name of this piece of trim? Thanks!
 
hi all, if im not wrong, using the schemes availables that some users have added, to acces to the rear of the dashboard (ODO), i need to access there there to put this piece in place, its necessary previously to take out 1/2 of the inner part of the car😓

Since you have to remove the frame to access the odometer screen, and to remove that frame you need to remove the other frame from the center display, and to remove that one you have to take off a lot more trim pieces, right? Or am I just getting confused by the diagrams?

Does anyone know the exact location of that connector? Can you access it without having to take everything apart? By accessing it from below?
 

Attachments

  • 2e24fa84-84ee-4107-8307-0077f8c8b093.webp
    2e24fa84-84ee-4107-8307-0077f8c8b093.webp
    159.3 KB · Views: 25
  • d5362033-2ab9-4143-b9f8-cec8d26d6561.webp
    d5362033-2ab9-4143-b9f8-cec8d26d6561.webp
    191.7 KB · Views: 23
Last edited:
Man there is a lot of good info in this forum. Y’all rock!

That LC theft recovery pic w/ all what was taken off is crazy - guess that all ended up on eBay…

Even they didn’t want the roof rack cross bar noise-makers!

IMG_1770.webp
 
Finally done💪🏻 thanks all the team
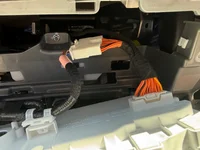
Now I just need to run the rear sensor wires from the passenger compartment to the rear bumper. Has anyone done this before? I’ve already figured out where to route them from the front, but I’m not sure how to run them from the trunk to the rear bumper. Any help would be greatly appreciated!
 

Attachments

  • IMG_0552.webp
    IMG_0552.webp
    215.7 KB · Views: 20
  • IMG_0551.webp
    IMG_0551.webp
    192 KB · Views: 17
  • IMG_0549.webp
    IMG_0549.webp
    101.4 KB · Views: 19
  • IMG_0547.webp
    IMG_0547.webp
    315.2 KB · Views: 18
  • IMG_0544.webp
    IMG_0544.webp
    219.9 KB · Views: 21
Finally done💪🏻 thanks all the team
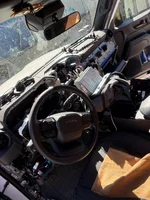
Now I just need to run the rear sensor wires from the passenger compartment to the rear bumper. Has anyone done this before? I’ve already figured out where to route them from the front, but I’m not sure how to run them from the trunk to the rear bumper. Any help would be greatly appreciated!
I may have missed it, but I'm unsure what you are installing. It would make a difference on my advice on routing. I have wires routed along the driver's side trim panels/door sill plates/headliner and others routed under the center console/under the carpet/under the cargo floor and exiting through the rear hatches accordion boot to an external antenna .
 
Back
Top Bottom