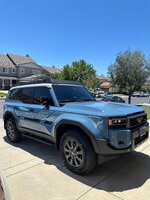
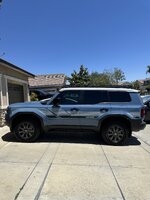
Where'd you get your mudflaps? I've been looking at the ones like this in Amazon but I'm hesitant since there's no reviewsPicked up a set of BBS TRD Pro take offs and added some First Edition style mud flaps
Navigation
Install the app
How to install the app on iOS
Follow along with the video below to see how to install our site as a web app on your home screen.
Note: This feature may not be available in some browsers.
More options
You are using an out of date browser. It may not display this or other websites correctly.
You should upgrade or use an alternative browser.
You should upgrade or use an alternative browser.
🛠️ What Have You Done To Your LC250 Today?
- Thread starter pnwlandcruiser_
- Start date
Finished the lift install put it on all the bump stops and no clearance or binding issues. 3” front and 2.1” rear lift with 3/4” rake. With the diff drop pinion angle changed by 3 degrees and cv joints are almost level at ride height. Rear pinion angle barely changed and there is no need for changing rear upper and lower arms
Gained about 1.5” of articulation both front and rear. Same hill also before and I couldn’t get a tire to lift anymore.
Next up bumper install.


Gained about 1.5” of articulation both front and rear. Same hill also before and I couldn’t get a tire to lift anymore.
Next up bumper install.
What company did you end up going with for your lift?Finished the lift install put it on all the bump stops and no clearance or binding issues. 3” front and 2.1” rear lift with 3/4” rake. With the diff drop pinion angle changed by 3 degrees and cv joints are almost level at ride height. Rear pinion angle barely changed and there is no need for changing rear upper and lower arms
Gained about 1.5” of articulation both front and rear. Same hill also before and I couldn’t get a tire to lift anymore.
Next up bumper install.
View attachment 36370
View attachment 36371
View attachment 36372
View attachment 36373
View attachment 36374
Personally, I'd get rock sliders before I got a bumper to protect your side body.
Not that you asked.

Truck looks good!
Awesome!Finished the lift install put it on all the bump stops and no clearance or binding issues. 3” front and 2.1” rear lift with 3/4” rake. With the diff drop pinion angle changed by 3 degrees and cv joints are almost level at ride height. Rear pinion angle barely changed and there is no need for changing rear upper and lower arms
Gained about 1.5” of articulation both front and rear. Same hill also before and I couldn’t get a tire to lift anymore.
Next up bumper install.
View attachment 36370
View attachment 36371
View attachment 36372
View attachment 36373
View attachment 36374
When your passenger rear tire was at full droop were the brake lines from the frame to axle still ok?
I haven’t flexed mine that direction yet and that’s the only thing I still need to check.
No brake line issues front or rear the abs sensor lines front and rear are more of an issue but no issues at full droop for either.Awesome!
When your passenger rear tire was at full droop were the brake lines from the frame to axle still ok?
I haven’t flexed mine that direction yet and that’s the only thing I still need to check.
They were very tight when installing the springs though and it’s about 2 inches up from there to get the extend travel shock installed onto the lower eye on the axle.
This is Dobinsons GS 3” kit with UCAs, adjustable pan hard, adjustable rear end links and 15mm rear spacers. Front springs are uprated to 220lbs additional load. Rear are stock weight 1.6 lift height.What company did you end up going with for your lift?
Personally, I'd get rock sliders before I got a bumper to protect your side body.
Not that you asked.
Truck looks good!
I have dissent sliders I ordered in January which should arrive soon.
Victory 4x4 roof rackWhat have you done to your Land Cruiser 250 recently?
Attachments
Depends on the daySometimes when you're married going deaf is a good thing. Depends on the marriage I guess.


Another mods (DIY):
After a while drawer system (Front Runner) installed with my custom side/ top panels (fillers), I gained a lot of spaces and best organized gears for off-road / overlanding.
1 thing which I am not quite satisfied is losing the front OEM storage because the drawer system sits on top of it.
Thought about it, then today I executed it
I so dang happy that I got it just like what I dreamed about many nights hahaha
Gangs, attached are the photos of it
PS: I had tons of mods (you name them) that I posted / shared since last August, but never created any like “member built”. Hope those will give you some great ideas / inspirations or bad ideas to avoid ( hahaha I guess not )
Here is the old photo before Mille panels for the drawer doors panels
Attachments

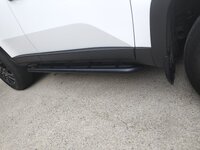
I ordered from here CarTrimHome. Shipping took ~2.5 weeks but not sure what the current timing looks like.Where'd you get your mudflaps? I've been looking at the ones like this in Amazon but I'm hesitant since there's no reviews
Wow that site has a lot of good stuff on it. I see they have the larger infotainment unit and from photos make it look like you could replace the smaller one on the 1958 with the larger size.I ordered from here CarTrimHome. Shipping took ~2.5 weeks but not sure what the current timing looks like.
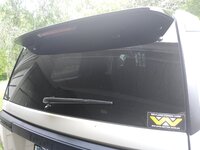
Photos will be always helpful than just words onlyFinally put my rock sliders on and added a "Weyland Yutani Building Better Worlds" sticker to my back glass. (Based off my screen name it's evident that I'm an Alien fan lol)
There ya go, tried to get a dog and a cat in a photo for you as well lolPhotos will be always helpful than just words only
Attachments

Where did you get the BBS TRD take offs..and how much money did they set you back?..Picked up a set of BBS TRD Pro take offs and added some First Edition style mud flaps
Spent my birthday yesterday at jury duty. So I took the long way home and brought the vehicle its first couple creek crossings/off roading. Not difficult by any means but it’s finally dirty haha.
Now treating myself to some good bbq.
Love Corkscrew. Haven’t been in a while and need to get back over there soon.
Where’d you go riding at? Looks like a nice little trip.
Is that price correct on there site $98 for the first edition mud flaps ?I ordered from here CarTrimHome. Shipping took ~2.5 weeks but not sure what the current timing looks like.

That is what I paid for them, I believe they are made in China but they seem to be well constructed. The front ones can be trimmed to better fit on the inner part of the wheel well but I didn’t bother with itIs that price correct on there site $98 for the first edition mud flaps ?
I like this setup. Are these from a Sequoia? Are they 18's? Tire size? Any fitment issues?Picked up a set of BBS TRD Pro take offs and added some First Edition style mud flaps
Similar threads
- Replies
- 10
- Views
- 2K
- Replies
- 8
- Views
- 3K
- Replies
- 177
- Views
- 17K


