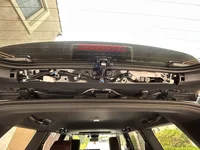
Plug-N-Play Rear Hatch Light LC250/PRADO

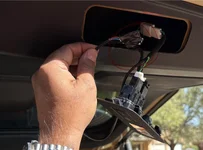
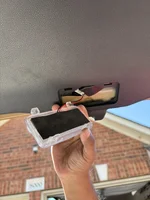
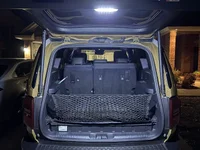
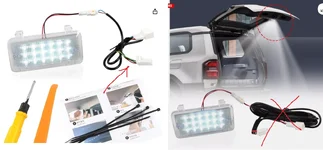
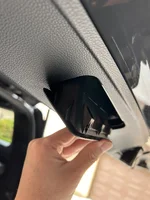
This upgrade is one of my top 3, along with hood struts & horn, all very easy to do. You can get this light on Amazon but you must select the correct one for your truck. I ordered the one for LC with power lift hatch.

Instructions for this are easy

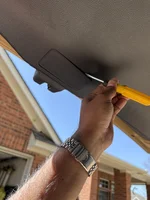
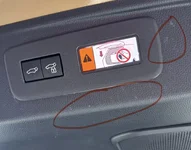
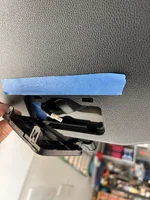
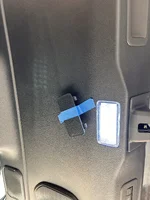
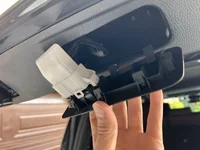
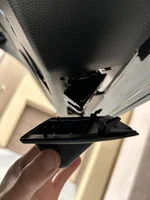
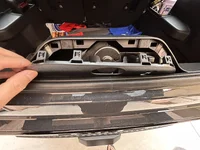
1. Remove the power lift control plate ( put tape down to prevent scratches- I failed to do this)
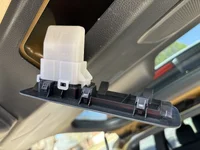
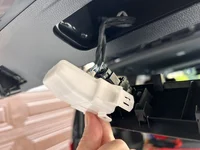
2. Remove the white plastic plug cover (don’t forget to put it back on when you’re done- I forgot)
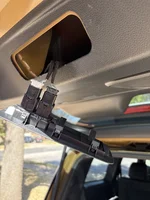
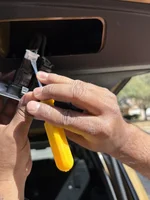
3. Remove the blank plate with the little screw driver provided.
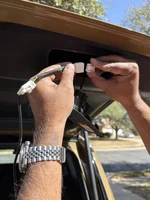
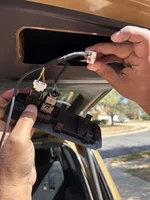
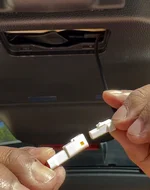
4. Disconnect the open/close button (white connector) and connect the Y cable (you can’t screw this up- they are male/female connections)
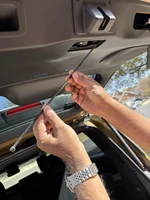
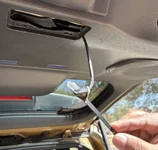
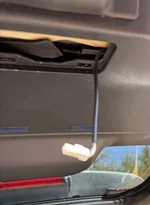
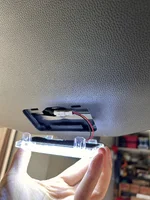
5. Fish the end of the Y cable to the blank opening - I used a long zip tie & duct tape
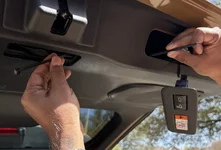
6. Connect the light & test it, if it works tuck the wires in push the light in( I had to give it a hit with the bottom of my fist)
7. Put the white cover back over the lift hatch plugs & snap the plate back in.
 

Attachments

  • IMG_5108.webp
    IMG_5108.webp
    152.3 KB · Views: 396
  • IMG_5112.webp
    IMG_5112.webp
    188.6 KB · Views: 355
  • IMG_5113.webp
    IMG_5113.webp
    209.8 KB · Views: 307
  • IMG_5122.webp
    IMG_5122.webp
    179.9 KB · Views: 319
  • IMG_5123.webp
    IMG_5123.webp
    142.1 KB · Views: 326
  • IMG_5124.webp
    IMG_5124.webp
    220.5 KB · Views: 330
  • IMG_5119.webp
    IMG_5119.webp
    130.9 KB · Views: 308
  • IMG_5125.webp
    IMG_5125.webp
    134.9 KB · Views: 317
  • IMG_5126.webp
    IMG_5126.webp
    144.3 KB · Views: 311
  • IMG_5127.webp
    IMG_5127.webp
    229 KB · Views: 348
  • IMG_5128.webp
    IMG_5128.webp
    141.1 KB · Views: 319
  • IMG_5129.webp
    IMG_5129.webp
    96.3 KB · Views: 325
  • IMG_5132.webp
    IMG_5132.webp
    298.3 KB · Views: 336
  • IMG_5134.webp
    IMG_5134.webp
    279.7 KB · Views: 379
This upgrade is one of my top 3, along with hood struts & horn, all very easy to do. You can get this light on Amazon but you must select the correct one for your truck. I ordered the one for LC with power lift hatch.

Instructions for this are easy

1. Remove the power lift control plate ( put tape down to prevent scratches- I failed to do this)
2. Remove the white plastic plug cover (don’t forget to put it back on when you’re done- I forgot)
3. Remove the blank plate with the little screw driver provided.
4. Disconnect the open/close button (white connector) and connect the Y cable (you can’t screw this up- they are male/female connections)
5. Fish the end of the Y cable to the blank opening - I used a long zip tie & duct tape
6. Connect the light & test it, if it works tuck the wires in push the light in( I had to give it a hit with the bottom of my fist)
7. Put the white cover back over the lift hatch plugs & snap the plate back in.
Works perfectly!
 

Attachments

  • IMG_5141.webp
    IMG_5141.webp
    266.4 KB · Views: 379
Works perfectly!
Looks good! We 2025 guys have two little light's that can't be turned off when the hatch is open unless you shove something into the latch making the cruiser think the hatch is closed... I hope an easy plug in play comes out for the two little lights with off switches like this! good results! good job installing that
 
The fe has two little lights too. I’m wondering if this is a needed upgrade… anyone with two little lights already there install?
 
This upgrade is one of my top 3, along with hood struts & horn, all very easy to do. You can get this light on Amazon but you must select the correct one for your truck. I ordered the one for LC with power lift hatch.

Instructions for this are easy

1. Remove the power lift control plate ( put tape down to prevent scratches- I failed to do this)
2. Remove the white plastic plug cover (don’t forget to put it back on when you’re done- I forgot)
3. Remove the blank plate with the little screw driver provided.
4. Disconnect the open/close button (white connector) and connect the Y cable (you can’t screw this up- they are male/female connections)
5. Fish the end of the Y cable to the blank opening - I used a long zip tie & duct tape
6. Connect the light & test it, if it works tuck the wires in push the light in( I had to give it a hit with the bottom of my fist)
7. Put the white cover back over the lift hatch plugs & snap the plate back in.
Excellent write-up. Thanks much and your pics are really helpful.
 
Excellent write-up. Thanks much and your pics are really helpful.
Pretty easy install, i just hate how everything felt so cheap and flimsy. For the price, this vehicle really feels unfinished. Like i said, the horn, hood struts and this rear hatch light should have come standard for all trims - its only $100 for these things, definitely costs less for Toyota.
 
The little lights will help, however if you have much loaded up back there, they will not do much, as they will be blocked. IMO they should be higher up.

Roundrock_Cruiser, thanks for the pictures and notes on the install.

Sadly, what really is needed is simply a light in the ceiling back there. I have never understood by Toyota doesn't do this. As if you want to just open the glass, the rear hatch back light will not do any good. The 2010 5th gen trail 4-runner was the same way, however it did have the rear catchlights built in.

Paul
 
The little lights will help, however if you have much loaded up back there, they will not do much, as they will be blocked. IMO they should be higher up.

Roundrock_Cruiser, thanks for the pictures and notes on the install.

Sadly, what really is needed is simply a light in the ceiling back there. I have never understood by Toyota doesn't do this. As if you want to just open the glass, the rear hatch back light will not do any good. The 2010 5th gen trail 4-runner was the same way, however it did have the rear catchlights built in.

Paul
This is where I'm at. I think I'm going to look for just a good rechargeable magnetic red/white light I can add to the bottom of the Victory molle shelf I have back there. I don't want to deal with running wires for a permanent light.

With that said, I'm still going to add the hatch light that connects to the hatch buttons.
 
I have a brand new center hatch light for sale if anyone is looking to get one slightly cheaper
 
I did this the other day, super quick install. Only semi aggravating thing is fishing the wire across. I used a old car antenna that I use for such fishing situations.
The light puts out a crazy amount of light too.
 
Got her done last night, just plugged into the Close switch on the hatch.
 
Hey guys, there are 2 products out there, so be mindful of which one you buy. I made the mistake of buying the wrong one.. the one that requires fishing it through the liners to tap into the tiny LED light next to the battery.

The 5-minute-install version taps into the tailgate Open/Close button.

But, I made mine work by ripping the panels open, found a constant 12v source and tapped into it. (There is no way I was going to want to fish the wire through the flexi-conduit and potentially F-up the delicate headliner).
For what it's worth, I hope my mistake helps someone with the non-powered tailgate model.

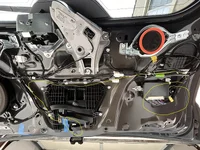
Here is how you properly remove the entire tailgate panel.

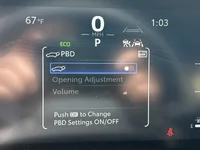
1. Disable the PBD (Power Back Door) if yours is equipped with the power gate. I have the LC LC mid model.
2. Open the glass hatch, remove the plastic cover to the wiper motor.
3. Pop open the handle cover, center latch cover, and the Open/Close button switch panel. I removed that white connector cover and shoved the switch panel into the cavity.
4. Pop off the entire tailgate panel, but start at the top narrow end that covers the hinge area.
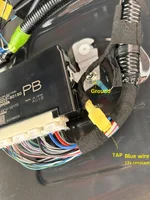
5. I located constant 12V power feeding the Door Network module. Blue wire.
6. Tap the thick blue wire and ground to a bolt.
7. Tape or zip-tie the cable leading to the location of the new LED lamp.
8. Close it all up, by reassembling in reserve order. Then re-enable PBD.

The lamp works for me. I prefer the manual On/Off only feature. It is must for those who want to keep the lamp on while camping. Other thoughts --I discovered the power provided by the tailgate switch is only about 8v. (I think) I don't have anything to compare to, but this 12v setup makes for a brighter lamp.
 

Attachments

  • IMG_8.webp
    IMG_8.webp
    354.3 KB · Views: 292
  • IMG_9.webp
    IMG_9.webp
    419.7 KB · Views: 252
  • IMG_10.webp
    IMG_10.webp
    591 KB · Views: 252
  • IMG_11.webp
    IMG_11.webp
    511.4 KB · Views: 261
  • IMG_12.webp
    IMG_12.webp
    847.9 KB · Views: 255
  • IMG_7.webp
    IMG_7.webp
    262.5 KB · Views: 242
  • IMG_6.webp
    IMG_6.webp
    129.4 KB · Views: 238
  • IMG_5.webp
    IMG_5.webp
    118.5 KB · Views: 231
  • IMG_4.webp
    IMG_4.webp
    200 KB · Views: 222
  • IMG_3.webp
    IMG_3.webp
    244.5 KB · Views: 234
  • IMG_2.webp
    IMG_2.webp
    288.7 KB · Views: 218
  • IMG_1.webp
    IMG_1.webp
    107 KB · Views: 253
  • 1743368145012.webp
    1743368145012.webp
    68.4 KB · Views: 311
Last edited:
Hey guys, there are 2 products out there, so be mindful of which one you buy. I made the mistake of buying the wrong one.. the one that requires fishing it through the liners to tap into the tiny LED light next to the battery.

The 5-minute-install version taps into the tailgate Open/Close button.

But, I made mine work by ripping the panels open, found a constant 12v source and tapped into it. (There is no way I was going to want to fish the wire through the flexi-conduit and potentially F-up the delicate headliner).
For what it's worth, I hope my mistake helps someone.

Here is how you properly remove the entire tailgate panel.

1. Disable the PBD (Power Back Door) if yours is equipped with the power gate. I have the LC LC mid model.
2. Open the glass hatch, remove the plastic cover to the wiper motor.
3. Pop open the handle cover, center latch cover, and the Open/Close button switch panel. I removed that white connector cover and shoved the switch panel into the cavity.
4. Pop off the entire tailgate panel, but start at the top narrow end that covers the hinge area.
5. I located constant 12V power feeding the Door Network module. Blue wire.
6. Tap the thick blue wire and ground to a bolt.
7. Tap or zip tie the cable leading to the location of the new LED lamp.
8. Close it all up, by reassembling in reserve order. The re-enable PBD.

The lamp works for me. I prefer the manual On/Off only feature. It is must for those who want to keep the lamp on while camping. Other thoughts -- I discovered the power provided by the tailgate switch is only about 5v-8v. I don't have anything to compare to, but this 12v setup might be brighter.
Which is the right one to buy? I have a 2024 LCLC with Premium Pack. Just want to plug it in without having to fish any wires. Thank you for the help.
 
I ordered this light a few days ago and received it today. Like everyone else has said it was extremely easy to install. It took longer to get the switches and cover off than to complete the install. It helped to use a wire as a “fish tape” to pull the wire from the switch cavity to the light cavity. Thanks to everyone for the links and info.
 
This upgrade is one of my top 3, along with hood struts & horn, all very easy to do. You can get this light on Amazon but you must select the correct one for your truck. I ordered the one for LC with power lift hatch.

Instructions for this are easy

1. Remove the power lift control plate ( put tape down to prevent scratches- I failed to do this)
2. Remove the white plastic plug cover (don’t forget to put it back on when you’re done- I forgot)
3. Remove the blank plate with the little screw driver provided.
4. Disconnect the open/close button (white connector) and connect the Y cable (you can’t screw this up- they are male/female connections)
5. Fish the end of the Y cable to the blank opening - I used a long zip tie & duct tape
6. Connect the light & test it, if it works tuck the wires in push the light in( I had to give it a hit with the bottom of my fist)
7. Put the white cover back over the lift hatch plugs & snap the plate back in.
Thanks for the reminder on putting down tape. Works like a charm and the light installation went smoothly and left no marks. Of course, I had to go with blue painters tape because of the color and leaves no residue or need for clean up. 👍
 
We offer a similar light, but also have cargo area lights that are 100% plug and play as well.
IMG_6285.webp
 
Supporting Vendors View all →
Rhino Rack
Back
Top Bottom