Hello all, can someone with access to TIS post the component and wiring diagram for the digital rear view mirror? Trying to to install a radar detector using a Blendmount with a mirror power tap. Don't want to break anything! Thanks in advance.
Navigation
Install the app
How to install the app on iOS
Follow along with the video below to see how to install our site as a web app on your home screen.
Note: This feature may not be available in some browsers.
More options
You are using an out of date browser. It may not display this or other websites correctly.
You should upgrade or use an alternative browser.
You should upgrade or use an alternative browser.
Need Wiring & Component Diagram for Digital Rear View Mirror from TIS
- Thread starter YotaPilot
- Start date
This is what I found on Blendmounts site under the mount I ordered this morning.Hello all, can someone with access to TIS post the component and wiring diagram for the digital rear view mirror? Trying to to install a radar detector using a Blendmount with a mirror power tap. Don't want to break anything! Thanks in advance.
Attachments

- Moderator
- #3
I don't know if this will help or not.....
Attachments
-
Digital Rear-view Mirror.pdf46.1 KB · Views: 363
-
Option Connector (Dash Panel Camera).pdf47 KB · Views: 208
-
Rear View Monitor System.pdf349.7 KB · Views: 217
-
Q1 Map Light Assembly.pdf291.6 KB · Views: 153
-
Q10 Inner Rear View Mirror Assembly.pdf272.4 KB · Views: 155
-
Q11 Inner Rear View Mirror Assembly.pdf268.4 KB · Views: 151
-
Q22 Option Connector (Drive Recorder).pdf148 KB · Views: 157
-
Mirroor REAR VIEW MIRROR.pdf751.7 KB · Views: 223
- Moderator
- #5
I added it to the orig postVery helpful - thanks much!. Is there a diagram showing how the rear view mirror mount and cover disassembles? Not sure how to unsnap cover.
How did it turn out? What wires did you use?Outstanding!! Thanks
Bump for info.
any advice on removing the cover no 2? The pdf linked doesn't show the instructions.
I'd been trying to wire my Valentine One just under the mirror with a mirror mount. I assume the wiring behind(/above?) the mirror varies depending on trim & features.
Unlike users above, my RJ11 to red/black didn't match up with the white connector (mirror power) in the same red-to-red, black-to-black format. For me, red-to-red, and black-to-white/black twisted is the only combination I could find to give me switched power.
I've got a Vantrue dash cam going in next and am going to likely have to route it around the windshield, through the A pillar and to the fuse box. We'll see how it goes.
Last edited:
I ran into the same problem. Only red to red and black to black/white twist. However the power to the radar detector stays on even after turning off car. Did you have the same issue?I'd been trying to wire my Valentine One just under the mirror with a mirror mount. I assume the wiring behind(/above?) the mirror varies depending on trim & features.
Unlike users above, my RJ11 to red/black didn't match up with the white connector (mirror power) in the same red-to-red, black-to-black format. For me, red-to-red, and black-to-white/black twisted is the only combination I could find to give me switched power.
I've got a Vantrue dash cam going in next and am going to likely have to route it around the windshield, through the A pillar and to the fuse box. We'll see how it goes.
I ran into the same problem. Only red to red and black to black/white twist. However the power to the radar detector stays on even after turning off car. Did you have the same issue?
The wiring diagram that EOD posted will likely help, however, my Red/Black-white twisted IS switched power for me. If you have a multimeter, you can check these easily. Also keep in mind, the switched power won't be killed until the driver's door is opened.
I ended up getting a Dongar Pro USB-C inline adapter because I lease my LC and it will be the easiest to reverse. It's very well made. I'm using a mirror-tap coming out of the Dongar to power my Valentine One.
Which Dongar adapter exactly did you order? I also am trying to connect a V1 (and possibly a dashcam) to my 2024 LC.I ended up getting a Dongar Pro USB-C inline adapter because I lease my LC and it will be the easiest to reverse. It's very well made. I'm using a mirror-tap coming out of the Dongar to power my Valentine One.
Their website says that the RJ11 connector used with our Valentines is "incompatible" with their adapters...
Did you perhaps modify their adapter in some way?? What do you mean by "mirror-tap"? Pics?
Thank
I bought Dongar PRO Parking Mode Adapter (Toyota/Lexus version).Which Dongar adapter exactly did you order? I also am trying to connect a V1 (and possibly a dashcam) to my 2024 LC.
Their website says that the RJ11 connector used with our Valentines is "incompatible" with their adapters...
Did you perhaps modify their adapter in some way?? What do you mean by "mirror-tap"? Pics?
Thank
The Dongar goes in-between an OEM connector and gives you a pigtailed USB-C connector, basically. That is what you'd want to plug your Dashcam into. For the V1, they're right that an RJ11 isn't "compatible" with their adapter. There's a couple of ways around that but I chose to use a 'mirror tap' (you can just Google that.)
The mirror tap (or any generic brand on Amazon) will give you an RJ11-to-red/black wire. Usually on the Amazon versions, they sell them in a 3-pack with 3 different terminations (a spade, an NT, and a maybe some type of 090 crimp). You can use the one that suits your fitting best. At that point, you're just poking the mirror tap into a red/black (or, again in my case, red, black/white twisted) connection to find switched power for the V1.) Think of the the mirror tap and Dongar Pro as completely separate solutions for powering your two devices.
To anyone catching up on this thread, there are probably over 100 ways to achieve the end goal...getting power to both. Some solutions are more elegant than others and I'm certain one could use a USB-C splitter, build a custom pigtail, etc. but for someone who doesn't plan on heavy modifications (myself, for example) this is a quick and easy (and fully reversible) solution.
Update: I ended up using the following two items to complete the Uniden R8 install. Dash cam to follow. It was much simpler than the wire tap which seemed to not give me a solid connection where this solution was plug and play and worked immediatly as intended. Not sure if my wire tap was defective or if I wasn't making a good connection from red/red - black/black, but none the less, I'd recommend the following for those looking for simple and easy plug and play install of both radar and dash cam.
GPS Dash Cam Power Adapter, (10Pin Type B Connector) Mirror Camera Radar Charger Station GPS Dashcam Charger Cable for Select Toyota, Lexus, Subaru and More with Auto-dimming Rearview Mirror
Lenink USB to rj11 Radar Detector Cable Compatible with Uniden R1 R3 R7 DFR7 DFR8; Escort Passport, Beltronics STi Driver (1.5m/4.92ft)
- Moderator
- #17
Not sure what type of wire tap you were trying, but "Posi-Tap" are 100% the best I have ever used. Avail on Amazon.Update: I ended up using the following two items to complete the Uniden R8 install. Dash cam to follow. It was much simpler than the wire tap which seemed to not give me a solid connection where this solution was plug and play and worked immediatly as intended. Not sure if my wire tap was defective or if I wasn't making a good connection from red/red - black/black, but none the less, I'd recommend the following for those looking for simple and easy plug and play install of both radar and dash cam.
GPS Dash Cam Power Adapter, (10Pin Type B Connector) Mirror Camera Radar Charger Station GPS Dashcam Charger Cable for Select Toyota, Lexus, Subaru and More with Auto-dimming Rearview Mirror
Lenink USB to rj11 Radar Detector Cable Compatible with Uniden R1 R3 R7 DFR7 DFR8; Escort Passport, Beltronics STi Driver (1.5m/4.92ft)
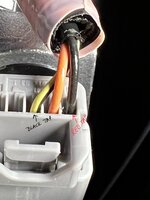
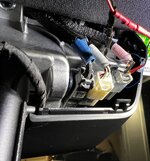
I used a Radar Mount RJ11 Mirror Wire Power Cord for Uniden R1 radar. I had to find another location that would cycle power on/off of device with the ignition/accessory power. The far right (passenger side) gray harness behind mirror with three wires worked (2024 LC First Edition).
1) The black adapter wire taps into cream colored/black wire of vehicle harness
2) The red adapter wire tapped into the solid black vehicles harness wire
My radar powers on with ignition and off when turning the vehicle off as it should. I’ll attach photos to help clarify.
1) The black adapter wire taps into cream colored/black wire of vehicle harness
2) The red adapter wire tapped into the solid black vehicles harness wire
My radar powers on with ignition and off when turning the vehicle off as it should. I’ll attach photos to help clarify.
Attachments
This looks like an excellent/easy solution. But what is that plug feeding to/from that I'm tapping into?I used a Radar Mount RJ11 Mirror Wire Power Cord for Uniden R1 radar. I had to find another location that would cycle power on/off of device with the ignition/accessory power. The far right (passenger side) gray harness behind mirror with three wires worked (2024 LC First Edition).
1) The black adapter wire taps into cream colored/black wire of vehicle harness
2) The red adapter wire tapped into the solid black vehicles harness wire
My radar powers on with ignition and off when turning the vehicle off as it should. I’ll attach photos to help clarify.
Worried about affecting electronics by current draw, even if radar detector is minor.
Similar threads
- Replies
- 3
- Views
- 340
- Replies
- 4
- Views
- 1K
- Replies
- 2
- Views
- 510
- Replies
- 3
- Views
- 2K
- Replies
- 46
- Views
- 6K


