Car smells strongly like mildew after rain/wet

Following, as I have this on my 2024 LC250. No sunroof. It is certainly the top window seal that smells moldy/mildewy. I will be bringing this up to my dealership, along with my random whining metal sound between 30-40 mph that is not brake related. UGH!
 
Has anyone tried pouring bleach or equivalent that will not affect warranty down the window seal ?
That may reduce the spore count temporarily, but it will grow more as soon as it rains again. The outer window belt seals are made of the wrong material and they'll continue to absorb moisture.

The fix is replacing them with the updated part numbers and I would recommend removing the lower plugs in the doors too so they can drain like normal doors.
 
Weโ€™ve been having tons of rain and LC stinkkksss. Went to the dealer and waited for 4 hours just for them to do a subpar inspection. At least I have it in writing, I guess. Called Toyota Corporate to file a complaint; they tried to give me the runaround. I got them at least to create a case number for this. I was advised to go to another dealership. Unfortunately, they all suck in my areaโ€ฆgot more rain in the forecast, so might try to book an appointment for next Thursday at another location.
 
Last edited:
I replaced my belt moldings and pulled the drain plugs. If you order the parts noted you can see where the tab release is to try to remove the old part. I got some plastic pry tools from harbor freight, placed a rag between the tool and paint, and then pried the old part to release the tab and ended up breaking the tabs on each of the four parts that were replaced. Once they are released/broken, you can easily pull them out.

The old ones definitely smelled really bad and retained that smell when it was dry.

Apparently the used car I bought was sealed long enough that my vehicle still smells when it rains. It is fainter though. I popped the front door panel off and I'm ordering a steam cleaner and going to try to get rid of the mold inside the door at the bottom. I guess this gives me the opportunity to remove the broken part from the door in regards to the tabs that broke off.
Just to confirm I understand. You donโ€™t need to remove the door card for the install? You can just pop them on and off with a plastic trim piece?
 
within a few days of driving my new landcruiser commercial out of the dealership I removed the rear door cards to take out the window blanks - they were soaking wet inside. 6 months later (new car !) I have rust developing on the door sills too. There is definitely water ingress or condensation getting into the door panels, though I doubt that would account for the musty smell, unless the fabric sound insulation inside is wet also.
Welcome to the asylum.

I hope that you or your dealer can get things sorted.
 
Following, as I have this on my 2024 LC250. No sunroof. It is certainly the top window seal that smells moldy/mildewy. I will be bringing this up to my dealership, along with my random whining metal sound between 30-40 mph that is not brake related. UGH!
Welcome to the asylum.

I hope that you or your dealer can get things sorted.
 
Just to confirm I understand. You donโ€™t need to remove the door card for the install? You can just pop them on and off with a plastic trim piece?
Correct. This is all done from the outside, It's possible that a piece of the hook will break off and fall into the door but if you pry slowly rather than abruptly, it should release without dropping anything inside.

EDIT: all this to say, if you ended up with little plastic chunks inside the door you may want to remove the door panels to fish them out. I wouldn't worry about this too much.
 
Correct. This is all done from the outside, It's possible that a piece of the hook will break off and fall into the door but if you pry slowly rather than abruptly, it should release without dropping anything inside.

EDIT: all this to say, if you ended up with little plastic chunks inside the door you may want to remove the door panels to fish them out. I wouldn't worry about this too much.
Thanks for all the info so far. Would appreciate any photos with arrows/guidance on how to do this, if possible, no worries if not. FYI Iโ€™m seeing nothing online about how to do this so if you made a video, it would probably gets tons of attention.
 
Thanks for all the info so far. Would appreciate any photos with arrows/guidance on how to do this, if possible, no worries if not. FYI Iโ€™m seeing nothing online about how to do this so if you made a video, it would probably gets tons of attention.
I'll try to get something together for you this coming week! If you have a metal trim removal tool, some microfibers, and possibly a little cardboard you'll be in business.
 
Like others suggest. All doors have rubber grommet drain plugs. Try removing to identify where water intrusion has occurred. Then leave out till cured...
 
Thanks for all the info so far. Would appreciate any photos with arrows/guidance on how to do this, if possible, no worries if not. FYI Iโ€™m seeing nothing online about how to do this so if you made a video, it would probably gets tons of attention.
Untitled design.webp

Ok this picture is a 4Runner, but the process is identical. You'll want a microfiber and possibly some cardboard too, placed below the trim removal tool, to protect your paint. Gently push in and underneath the belt molding and when the tool bottoms out, you'll pry upwards. It will take a little force. You'll hear it snap and then the trim can be lifted up and removed. They are one time use, so removing it will break it, but that's not an issue. Replace by sitting one side firmly in, laying it down, and then give it a good push downwards. You'll hear it click in.

Done!
 
View attachment 71314
Ok this picture is a 4Runner, but the process is identical. You'll want a microfiber and possibly some cardboard too, placed below the trim removal tool, to protect your paint. Gently push in and underneath the belt molding and when the tool bottoms out, you'll pry upwards. It will take a little force. You'll hear it snap and then the trim can be lifted up and removed. They are one time use, so removing it will break it, but that's not an issue. Replace by sitting one side firmly in, laying it down, and then give it a good push downwards. You'll hear it click in.

Done!
Ohhhhh this makes lots of sense now. Thank for you the picture!
 
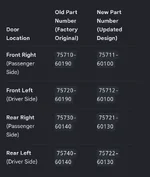
Update. I went for service to have these replaced but the old part numbers from the previous linked post were actually for the inside moldings. These should be the correct old and new part numbers per AI. Posting for informational purposes because the tech could not find in their cataloge where the old parts had been superseded.

Updated with a photo because text format was messed up.
 

Attachments

  • Screenshot_20260730_122429_Chrome~2.webp
    Screenshot_20260730_122429_Chrome~2.webp
    50 KB · Views: 33
Update. I went for service to have these replaced but the old part numbers from the previous linked post were actually for the inside moldings. These should be the correct old and new part numbers per AI. Posting for informational purposes because the tech could not find in their cataloge where the old parts had been superseded.

Old Part Number (Factory Original)New Part Number (Updated Design)Front Right (Passenger Side)75710-6019075711-60100Front Left (Driver Side)75720-6019075712-60100Rear Right (Passenger Side)75730-6014075721-60130Rear Left (Driver Side)75740-6014075722-60130
Good intel - did the service center confirm these as the correct new parts?
 
Thank you very much @jmqb1 for pointing out that my old part numbers are incorrect. I will get the article updated.

I can confirm that the new part numbers are correct and current. Several have written to me recently to let me know these did the trick for them too.
 
Thank you very much @jmqb1 for pointing out that my old part numbers are incorrect. I will get the article updated.

I can confirm that the new part numbers are correct and current. Several have written to me recently to let me know these did the trick for them too.
I want to thank you for writing that great article in the first place!
 
Supporting Vendors View all โ†’
Back
Top Bottom