🛠️ Member Build Anderson Connector setup for Off-road Compressor

Member Build
Regardless of where anyone else tied into the 12v battery, you have four possible choices (as you have marked on your picture):

1 - The one with the yellow arrow is the best choice, IMO, due to ....... it's protected by a 200amp fusible link. (you have it marked with a purple X) and serves no function for the LC's systems, other than a convenient place to attach to the 12v battery

2 - The one you have marked with a green circle would be my 2nd choice but adds to the amount of stuff hanging off the battery's POS post and would need to be removed/loosened if a battery change out was required in the future.

3 - The green circle with the purple X through it, is essentially the same as the POS battery post.

4 - The 2nd one marked with a purple X, while it would work, it is connected to the main 350 amp fusible link that's the power source for the rest of the LC's computers and if it blows your LC just became a brick.
View attachment 70808
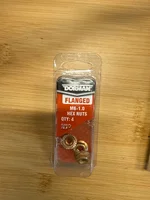
Stupid question... any idea what size/thread pattern nut goes on the post with the yellow arrow, my LC has just a post there so I need to get a nut to hold down any connections I attach there...
 
Stupid question... any idea what size/thread pattern nut goes on the post with the yellow arrow, my LC has just a post there so I need to get a nut to hold down any connections I attach there...
It’s an M6 flanged hex bolt 1mm thread
 

Attachments

  • image.webp
    image.webp
    414.8 KB · Views: 81
Yep, nice install.
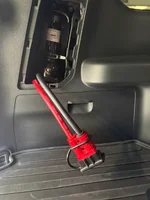
I’m still skittish about drilling holes and the like in my vehicle (but have been slowly warming to the practice!). I just copycatted PixelMagic after getting the sage help from the local forum wizards and did a concealed install behind the jack access door. I don’t use it much but it works great when I do.
Thanks again to PixelMagic for taking the time to make the original install post.
Another Forum winner.
 

Attachments

  • IMG_9583.webp
    IMG_9583.webp
    242.6 KB · Views: 51
Yep, nice install.
I’m still skittish about drilling holes and the like in my vehicle (but have been slowly warming to the practice!). I just copycatted PixelMagic after getting the sage help from the local forum wizards and did a concealed install behind the jack access door. I don’t use it much but it works great when I do.
Thanks again to PixelMagic for taking the time to make the original install post.
Another Forum winner.
This will work great too, and could be easily mounted later if you feel better about cutting/drilling. Nice work.
 
I’ve never used one of these; thanks for sharing. Worth trying for ten bucks. Do they seem to work better than a piece of sand paper (that’s what I’ve been using)?
Yes, but they take a bit of practice to get best result. Use light pressure, let the tool do the work. They're also extremely good at deburring flesh, so be careful.
 
I’ve never used one of these; thanks for sharing. Worth trying for ten bucks. Do they seem to work better than a piece of sand paper (that’s what I’ve been using)?
I use one weekly, but mostly on metal. Some advise.......... These are designed to deburr metal, but work on plastic really well, that being said they will completely cut through plastic edges, so be light on the pressure until you get the feel for it.
 
Thanks guys. $10 bucks seems like a great way to try out a new tool. I’ll take care to go slow so I don’t cut through plastic (or flesh)!
 
This brings me joy. For the electro-phobic, any chance of a parts list here? I have a friend willing to help but not sure what all'd be involved here.
For my build, here are the parts I purchased:
-100A Circuit breaker (because my compressor can pull as high as 90Amps)
-4 AWG wires (used the positive wire to run from the battery to the circuit breaker)
-4 AWG wires with Anderson (positive from circuit breaker and negative direct to neg ground on battery)
-Extra Aderson plugs to install on compressor power cord and outlet mount with cover
-M6 1.0 flange nut for battery terminal (mine did not have a nut on it) posted above

Tip: Before disconnecting battery, make sure you either turn off the "security PIN code" in the head unit or have it memorized, because you'll sometimes be locked out of your head unit after a battery d/c and reconnect (don't ask me how I found this out :)
Disconnect battery ground first, then positive. Plan your wiring runs, cut any holes and route wiring. It was handy to have the circuit breaker in the loop, so it could be left open during the remainder of the install without sparking from the wires on the downside of the circuit breaker. Then once everything was connected, just close the breaker and its active.

I still plan to always have the engine running when using this outlet, not wanting to take any chances flattening the starter battery.
 
Last edited:
As an alt "POS" and "Neg" cable connection points, there is an unused stud under the Red plastic cover (near the pos battery post) that's protected by an OEM 200 amp fusible link, that appears to be intended for an OEM air compressor (but the LC doesn't have). The OEM Neg 12v battery cable connection to LC is located behind the "D" pillar trim panel.

You don't have to remove the trim panel, but it made it easy........

fusible link 2.webp


My routing.webp
 
Back
Top Bottom