I'm about to swap the wheels on my 25' LC250. Looking at the manual and posts on here, I believe I've located the jack point on the front of the frame. I'm using a power built all in one bottle jack and stand rather than the bottle jack that comes from the factory with truck. There's a weld bead along the frame right where the jack/stand sits. Before I used this spot to jack the front of the car up I wanted to double check this wasn't an issue. I could move it slightly back but there is a whole in the frame slightly back. I could move it slightly forward, but that's where the frame starts to bend towards the middle of the car. I'd like to use the recommended jack point if it's not going to be an issue to have the jack/stand placing weight on that weld. Thanks!
Navigation
Install the app
How to install the app on iOS
Follow along with the video below to see how to install our site as a web app on your home screen.
Note: This feature may not be available in some browsers.
More options
You are using an out of date browser. It may not display this or other websites correctly.
You should upgrade or use an alternative browser.
You should upgrade or use an alternative browser.
Jack Points and Weld bead on frame, issue?
- Thread starter KWLC250
- Start date
I think you're fine anywhere there.
I would just try to find the place that the frame can sit even on the jack and, if you care about this kind of thing, where the jack will scratch up the frame the least. I have an old, thin (1/8") plastic cutting board I've cut up to make pads for my jack and jack stands because I'm particular about stuff like that.
I would just try to find the place that the frame can sit even on the jack and, if you care about this kind of thing, where the jack will scratch up the frame the least. I have an old, thin (1/8") plastic cutting board I've cut up to make pads for my jack and jack stands because I'm particular about stuff like that.
OP
OP
- Thread starter
- #5
IMO, use the OEM jack points to jack it up and place your jack stands under the axle tubes in the rear and under the frame in the front.
View attachment 36184
View attachment 36185
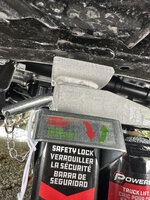
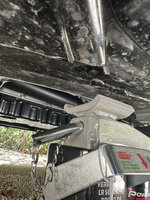
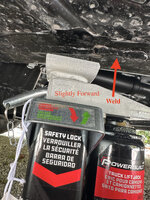
As far as I can tell this is the factory jack point (on the frame), correct? since it's a jack stand/jack combo and the top of the stand is what's actually going to be doing the lifting, I want to make sure that the wieght/pressure from the edges of the stand weren't going to stress the weld bead and cause any issues or cracking. The factory bottle jack wouldn't make contact with the weld, just the frame. But the way the the stand/jack "cradles" the frame it would make contact with the weld and most of the weight/stress would likely be there. IF that's not an issue, it's fine. But if that's not ideal, I'd likely move it up or back an inch or two to avoid the weld. Or use the factory bottle jack. This jack is just easier.
Attachments
- Moderator
- #6
The pinch seam (what I assume you're calling the weld bead) might in fact, bend with any side load. If it were me and I was dead set on using that jack and didn't want to bend the pinch seam, I'd cut the upward turned edges on the jack's shoe off and weld a new shoe (on top of the old shoe) with a slot for the pinch weld to fit into (kinda like the OEM jack's shoe)As far as I can tell this is the factory jack point (on the frame), correct? since it's a jack stand/jack combo and the top of the stand is what's actually going to be doing the lifting, I want to make sure that the wieght/pressure from the edges of the stand weren't going to stress the weld bead and cause any issues or cracking. The factory bottle jack wouldn't make contact with the weld, just the frame. But the way the the stand/jack "cradles" the frame it would make contact with the weld and most of the weight/stress would likely be there. IF that's not an issue, it's fine. But if that's not ideal, I'd likely move it up or back an inch or two to avoid the weld. Or use the factory bottle jack. This jack is just easier.
That weld is stronger than the frame itself if it was done properly. I've jacked at the same location with same type jack stands without a worry or issue.
OP
OP
- Thread starter
- #8
The pinch seam (what I assume you're calling the weld bead) might in fact, bend with any side load. If it were me and I was dead set on using that jack and didn't want to bend the pinch seam, I'd cut the upward turned edges on the jack's shoe off and weld a new shoe (on top of the old shoe) with a slot for the pinch weld to fit into (kinda like the OEM jack's shoe)
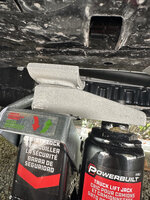
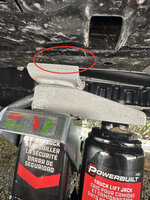
This is what I'm referring to if it's the pinch seam?
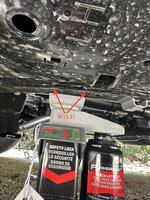
The green is the factory jack point, correct? Not sure what the hole is for (looks like maybe skid plate in the manual illustration. The video in the post referenced and linked above mentioned the 4Runner jack point has a square whole in the frame marking it's location. Not sure what this plastic piece is for either.
- Moderator
- #9
You'll be fine putting the jack or jack stand in that location. (that is what you called it, a "welded seam")
If you bend that while jacking........ something else has gone trerribly wrong.......LOL
(edit) To clarify for some......... it's not a pinch seam it's just a welded seam.
If you bend that while jacking........ something else has gone trerribly wrong.......LOL
(edit) To clarify for some......... it's not a pinch seam it's just a welded seam.
Last edited:
Unless I'm totally misunderstanding something, there's no pinch seam (pinch weld?) anywhere there. That's a unibody car thing. I don't think you'll find a pinch seam on the 250 unless you're trying to lift on the body somewhere.
OP
OP
- Thread starter
- #11
That's exactly what I thought. I was very confused by the mention of a pinch seam.Unless I'm totally misunderstanding something, there's no pinch seam (pinch weld?) anywhere there. That's a unibody car thing. I don't think you'll find a pinch seam on the 250 unless you're trying to lift on the body somewhere.
OP
OP
- Thread starter
- #13
Swapped em out today. Front Jack points on the frame were easy. It was a little harder finding a good spot on the rear end. The "cradle" of the stand/jack wasn't wide enough to cradle the rear end and was too tall to fit a 2x4 between them. It tried to use the factory bottle jack, it also didn't sit flush and actually slipped as I was attempting to lift the rear. Luckily the tire wasn't far even off the ground. So I went back to the power built jack/stand combo and tried to distribute the weight as best as possible. Seem to work out just fine.
Anyone who has swapped out or used the spare, did you actually use a torque wrench to tighten the down the spare with the spare tool kit? The manual says to tighten to 47ftlbs. I just snugged it up by hand real nice.
Anyone who has swapped out or used the spare, did you actually use a torque wrench to tighten the down the spare with the spare tool kit? The manual says to tighten to 47ftlbs. I just snugged it up by hand real nice.
I use ESCO jack stands and they are flat on top (work great with BMWs which have rubber jacking points from the factory) which makes placement a little easier because you do not need to worry as much about seam welds.
Similar threads
- Replies
- 1
- Views
- 2K
- Replies
- 1
- Views
- 488


