It sort of reminds me of the FJ Cruiser blue but not as good. Must agree that it's not my favorite one either.
Navigation
Install the app
How to install the app on iOS
Follow along with the video below to see how to install our site as a web app on your home screen.
Note: This feature may not be available in some browsers.
More options
You are using an out of date browser. It may not display this or other websites correctly.
You should upgrade or use an alternative browser.
You should upgrade or use an alternative browser.
2024+ Land Cruiser Heritage Blue Photo Thread
- Thread starter supersix
- Start date
Concur with the 'bug catching windshield' comment. I use this product on glass when refueling: https://www.amazon.com/gp/product/B004BFZRCQ/?tag=landcruiserforum-20I like the combination of blue/gray roof as well. The flatter windshield may be a real bug catcher. I hope they test for that with the prototypes.
The new Tundras have a plastic A pillar to absorb sand/rock chips. The painted ones on older 4Runners get rock chips in no time.
NOTE: I apply product, use station brush and rinse with washer fluid for best results.
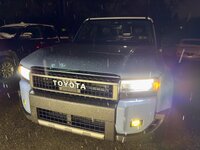
Snowing in North Texas today. Heritage Blue LC looks great with some snow on it
As an added bonus, I took the Cayman S out for some fun before immediately abandoning mission lol
View attachment 23866View attachment 23867
Snowing in North Texas today. Heritage Blue LC looks great with some snow on it
As an added bonus, I took the Cayman S out for some fun before immediately abandoning mission lol
Did you take your LC250 out in the snow in DFW? I drove around Coppell and Irving and it was fun.
@dtxlcfe I'm looking to do the exact FE roof rack side light install as you. Did you ever complete the wiring and could you share (or even PM me if needed) your results! Thanks!Found a better way in my opinion to route wires to the roof rack. Running them down the back and through the spare tire drop down hole then running wires in between spare tire and frame following some oem wires back to driver side after the back wheel. Now just gotta figure out how to come up to the engine bay. And still need to clean up the roof wiring once I’m done.
Yep, had to run some errands and pick up some supplies for home projects. The rig handled it beautifully, especially since I was going around before the plows had come through our area. Most of my driving was on fresh snow around 9am.Did you take your LC250 out in the snow in DFW? I drove around Coppell and Irving and it was fun.
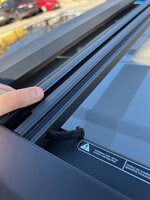
So I had a kill switch installed by a shop and asked the guy to clean that roof wiring up which you saw on my post. without my knowledge and desire, he routed the wires back through the front of the roof and down into the hood. He didn't ask me before he did this and I hated it. He destroyed all the work I did running it from the back and under the body. AND the drip molding Infront of the roof rack flew off at some point because that wire was jammed in there, so I ordered a new drip molding and am waiting on that to come in before re wiring the old way.@dtxlcfe I'm looking to do the exact FE roof rack side light install as you. Did you ever complete the wiring and could you share (or even PM me if needed) your results! Thanks!
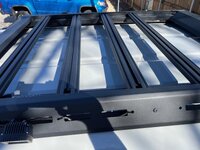
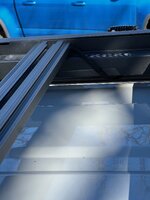
He also drilled a small hole in the roof rack cross member to run the wires from driver side to passenger side without being seen which I am ok with. so now the roof is clean but the wire coming down needs to be completely redone. photo below is how it looks right now without that drip molding piece i lost probably somewhere on the highway. I can take some pics later of how he did the actual rack wiring which isn't a bad solution, you will just need to be making your own harnesses with more exact lengths to not have a big mess up there.
Generally though wiring under the body you should need about 30 feet of this DT wiring and then you can use this 4 way splitter but in order to get it looking good, you will have to cut up that 4 way splitter and extend the lengths around to reach each light DT plug perfectly. Another splitter that might be easier to extend the lengths on would be this one but it is only 20 AWG, the other one is 16 which is preferred. With those extreme LED side lights, the 20 AWG did work but if you ever wanted to upgrade to larger lights like the double LED that ExLED offers, I am not sure the 20 AWG would carry enough volts to power given this is running through like 30 feet of wiring.
I am going to have a better off road shop re wire the wiring coming down from the roof this time, once i get that drip molding in. I just don't have the willpower to redo everything I already did once. they are gonna charge about $300 for that job.
Attachments

Here are some better pics of the roof wiring. Also included my caliraised switches. my favorite part about this setup is having those OEM switches in the factory blank spots. If I ever need more spots, I can get that aftermarket face plate on ebay which adds more blanks next to the camera view button.So I had a kill switch installed by a shop and asked the guy to clean that roof wiring up which you saw on my post. without my knowledge and desire, he routed the wires back through the front of the roof and down into the hood. He didn't ask me before he did this and I hated it. He destroyed all the work I did running it from the back and under the body. AND the drip molding Infront of the roof rack flew off at some point because that wire was jammed in there, so I ordered a new drip molding and am waiting on that to come in before re wiring the old way.
He also drilled a small hole in the roof rack cross member to run the wires from driver side to passenger side without being seen which I am ok with. so now the roof is clean but the wire coming down needs to be completely redone. photo below is how it looks right now without that drip molding piece i lost probably somewhere on the highway. I can take some pics later of how he did the actual rack wiring which isn't a bad solution, you will just need to be making your own harnesses with more exact lengths to not have a big mess up there.
Generally though wiring under the body you should need about 30 feet of this DT wiring and then you can use this 4 way splitter but in order to get it looking good, you will have to cut up that 4 way splitter and extend the lengths around to reach each light DT plug perfectly. Another splitter that might be easier to extend the lengths on would be this one but it is only 20 AWG, the other one is 16 which is preferred. With those extreme LED side lights, the 20 AWG did work but if you ever wanted to upgrade to larger lights like the double LED that ExLED offers, I am not sure the 20 AWG would carry enough volts to power given this is running through like 30 feet of wiring.
I am going to have a better off road shop re wire the wiring coming down from the roof this time, once i get that drip molding in. I just don't have the willpower to redo everything I already did once. they are gonna charge about $300 for that job.
Attachments


Winter finally arrived in Vancouver.

An overnight dusting in the mountains. MTS in 'auto' mode works pretty well imo.

Last edited:
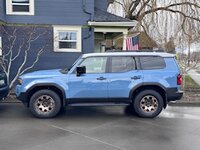
My new ‘25 Heritage Blue w/ Grayscape top… Rolling on 275/60R20 Nitto Recon Grapplers. Tinted front windows…. Love this beast.

- Moderator
- #154
Welcome to the Jungle!My new ‘25 Heritage Blue w/ Grayscape top… Rolling on 275/60R20 Nitto Recon Grapplers. Tinted front windows…. Love this beast.
View attachment 30348
Looks great!
Nice tires. Bluely amazing!
HB with the TRD Pro Tundra/Sequoia BBS wheels.
I gotta get my windows tinted. Looks sleekMy new ‘25 Heritage Blue w/ Grayscape top… Rolling on 275/60R20 Nitto Recon Grapplers. Tinted front windows…. Love this beast.
View attachment 30348
Similar threads
- Replies
- 5
- Views
- 438
- Replies
- 1
- Views
- 4K


