So, I've been reading a lot of threads and watching a lot of videos on how folks have solved the winch wiring issue. Specifically, making a home run from the 12v battery in the back to some type of wiring terminal under the hood. I thought I would share a few things here.
In a nutshell, I'm running 1/0 battery cable, positive & negative, from the battery in the rear to a terminal bracket under the hood. There will be a mega fuse holder very close to the battery on the positive wire in case of any catastrophic damage that could be caused in an accident. I'm going to start with a 250-amp fuse, most seem to be running this size without issue. However, the fuse holder can handle more amperage if needed. I will route the wire through the rear wheel fender well with waterproof wire glands as many have successfully done.
For the fuse holder, I came up with a simple bracket that will mount onto the battery tray cross support. I will post some pictures once installed. It's made to mount the Littlefuse Fuse Holder.
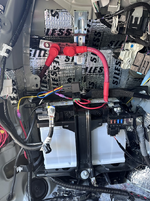
In the engine bay, in the empty space in front of the driver side fuse box, I will install this terminal bracket that will have two stand alone junction blocks. The wire will come from underneath and pass through the oblong slots that will have rubber grommets. The bracket will have room to mount an additional plate on standoffs above the junction blocks for future lighting control mounts.
I will post pictures as I progress through the install.

In a nutshell, I'm running 1/0 battery cable, positive & negative, from the battery in the rear to a terminal bracket under the hood. There will be a mega fuse holder very close to the battery on the positive wire in case of any catastrophic damage that could be caused in an accident. I'm going to start with a 250-amp fuse, most seem to be running this size without issue. However, the fuse holder can handle more amperage if needed. I will route the wire through the rear wheel fender well with waterproof wire glands as many have successfully done.
For the fuse holder, I came up with a simple bracket that will mount onto the battery tray cross support. I will post some pictures once installed. It's made to mount the Littlefuse Fuse Holder.
In the engine bay, in the empty space in front of the driver side fuse box, I will install this terminal bracket that will have two stand alone junction blocks. The wire will come from underneath and pass through the oblong slots that will have rubber grommets. The bracket will have room to mount an additional plate on standoffs above the junction blocks for future lighting control mounts.
I will post pictures as I progress through the install.
")


