[See Updates at end of this post, last edit 11/29]
All, this is bound to be fairly long. I'll try to keep it as tight as possible.
First, a lot of haters promised me this tank wasn't going to fit because china. Well, I have a 500-mile range LC250, and they don't.
I initially posted some info on the tank in question in LC Talk, under the thread Fuel Tank Options. The tank in question is here: FK NOTVUCH 110L(29 Gallon) Main Fuel Tank Fit for LC250
Price: $1230 US, plus shipping and tariffs of (for me) about $330 as I recall.
Shipping: Ships from China, they packed it extremely well and built a wood crate to protect it. It showed up flawless. Delivery took something like two months give or take.
Customer Service: Mike Lee is the Sales Manager and is a class act. Very responsive, knowledgeable, and credible. When I initially inquired about fit, they had not tested this on the US-Spec LC. But they took the question back to their tech team and concluded it would fit, and offered a guarantee if it didn't. Obviously, it worked and they are to be commended for their efforts. You can reach them via their CONTACT tab on their website.
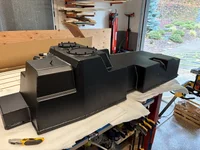
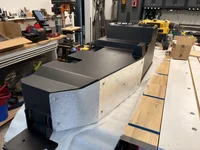
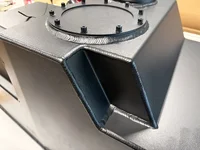
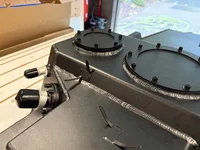
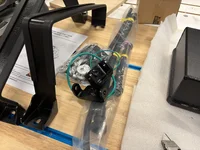
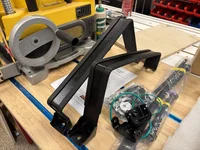
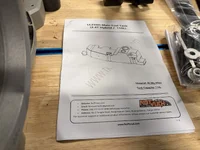
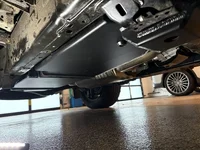
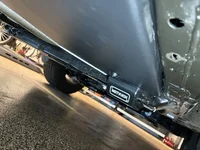
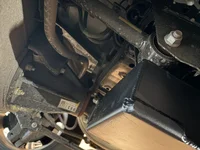
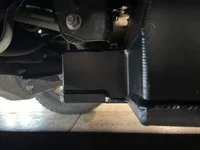
I am attaching some photos, all-pre-install but you get the idea.
Quality: The tank is an 5052 aluminum-magnesium alloy (corrosion resistant); the TIG welds look great, the powder coat finish was good, no visible flaws. The hardware seems to be of good quality and heavy duty. The seals provided and hoses all seem to be of OEM quality at least via visual inspection. There were concerns voiced on the previous thread about buying a chinese fuel tank - I'm not going to convince you otherwise if that is what you believe, but I can tell you the quality looks and feels as good as you're going to find, and at this price point it is hard to imagine it being better.
Installation Video:
This was for me the only source of instruction; I gave a few notes to Mike afterwards and he said they will add some written instructions for a few places where I had difficulty (removing three different fuel pump connectors without being able to really see them, thread pitches being similar but not the same on some parts and unlabeled, nothing big).
It's pretty straight forward; you remove the skid plate, support the tank, remove the hangers, drop the tank a little and remove the electrical and plumbing connections, drop the tank, pull out the pump and put it in the new tank, install a few new hangers and reinstall. The process isn't difficult, it's just the tight quarters that makes it harder.
I tackled this by myself, on the floor of my garage, with a jack and jack stands. I had the jack stands at their max length and it was just barely high enough to slide the new tank underneath. I'm talking just barely- like the fuel pump touched the bottom of the frame sliding it in. If you have access to an assistant, a vehicle lift, and crucially a scissor cart to support and lift the tanks up and down while you undo/redo the electrical and plumbing connections, you will have a much easier time. That said, I just proved it is possible to do without those things.
If you're wondering how i got the tanks up and down (the OEM with fuel still in it and heavy and awkward), I used a piece of plywood bolted to my floor jack, slid it underneath the tank and jacked it up. that was easy; installing was much more awkward - i used the same piece of plywood with some wood blocks under one end and slid the new tank up into position. You have to be VERY precise and close to the final landing spot to be able to make the plumbing and electrical connections. There is no more than maybe an inch of extra hose (especially the filler hose). It is extremely tight quarters and amplified if you're on your back trying to get the tank into position by yourself- again, a lift for the vehicle and scissor cart to lift the tank would make this WAY easier as shown in the video.
There are no issues with the fit of the tank. I know a lot of people were concerned about the rear suspension link being in the way because this is different from the lexus (and it's larger tank), but this isn't a lexus tank. It was designed for this vehicle.
I didn't measure the gas I transferred (with siphon pump) from my old tank to the new one, so I was unable to confirm how many gallons actually go into the tank before the pump stops. But, it was definitely north of half a tank, and I put 18.5gal in at the gas station shortly thereafter.
If you're wondering about fuel gauge, it will be wrong. The computer thinks you've got 17 gallons and you have 29. As far as I'm aware there is no good way to fix it on the dash. Further, the shape of the tank will make the relationship between the new tank and the oem tank non-linear. Eg., at full tank the ratio is about 1.7 (17:29gal). But the fuel light reportedly comes on with 4 gallons, which is a ratio of around 2 (2:4gal). So there isn't a clean / easy conversion factor you can apply to understand your remaining range. By far the simplest way is to set your trip A at refills, and set your mileage meter to "total average" instead of "trip average". That will give you the total mileage on the tank instead of the current trip. Then, just monitor your trip A miles and make some adjustment based on the mileage you're getting. I average about 19mpg, so 475 miles will be my mixed driving number to fuel light illuminating (25gal x19), and if the tank mpg is trending closer to 18 I'll go with 450 and if it is trending closer to 20 I'll go 500.
Overall this is a killer upgrade for me; makes the LC so much more functional for long trips without the hassle and expense of an aux tank. And, I will add, it's just as many gallons as you'd get with a saddle aux tank.
Edit again: confirmed tank is built from 5052 aluminum alloy w magnesium. Highly corrosion resistant and typically used in fuel tanks. 10% ethanol typically under normal use not corrosive enough to be an issue. If you are concerned you can use an ethanol treatment (sta-bil “in season” or “marine 360” are my personal picks) or use pure gas.
Ok, what else guys?
11/29 UPDATES
New info from vendor / me:
-Our fuel pump has an swirl pot design. I was able to confirm this elsewhere. If you're not familiar with Swirl Pots, they essentially prevent fuel pump starvation by placing the pump inside a "pot" that fills with fuel. The pump is ALWAYS submerged regardless of fuel level (unless truly empty). This prevents air in the fuel line during offroading, but in context of this conversation it also means the pump is always submerged and therefore the level of gas in the tank essentially doesn't matter from a cooling perspective. The pump is always submerged, with cool gas coming in and warm gas going out. Therefore, the legacy thinking we all grew up with that the tank has to remain 1/4 full all the time is...inaccurate. Also, you very much could run the tank down much lower than the fuel light without damaging the pump (until it goes empty...don't do that ha)
-The tank also has a built-in sump design which further reinforces fuel supply to the pump/swirl pot inlet.
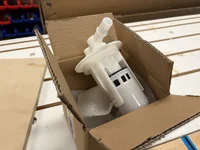
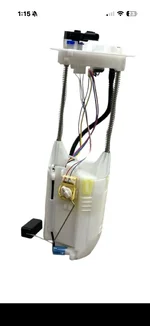
-Contrary to what was discussed previously at various points in this thread, the pump DOES have a float. It is attached to a modern potentiometer, but it very much has an external float. This can be seen in the instructional video when they remove & reinstall the pump (it's quick). (photo of our pump attached also)
-The full internal volume of the tank is 110L (just about 29 gallons), however due to cavities and venting and the like, it can be expected to "take" between 26.4 and 27.4 in every day conditions. If you could slosh it around and clear airspace you could get more. It is important to keep a headspace for thermal expansion and keeping gas out of the vapor canister and venting systems...so all tanks have a headspace for that reason (as I understand it, anyways). Also if the gas pump allows for slower filling rate you may be able to squeeze a bit more if the venting rate is the limiting factor.
-I previously reported that the Fuel Light should come on at 15L remaining (about 4 gallons). Turns out they say 15L to be conservative and prevent you from stranding yourself. It actually comes on between 15-20L (4-5.25 gal) and in my experience it came on at the high end, about 5+ gallons.
-When I say "fuel light" , it isn't clear what that means. The truck gives you a pop-up message first saying "fuel low", then the gas icon turns from white to orange (these may be simultaneous). Then the MTE hits zero and you get a "REFUEL" message. The 5+ gallon point is when the icon flips from white to orange.
Gauge & MTE accuracy:
-When I filled up (twice) the MTE reads the same as always, 302. It doesn't adjust for anything, as expected. It will always be wrong and there isn't a fixed conversion factor as you'll see from the charts.
-MPG is unaffected, as expected.
-Gauge reads 100% at full, as expected.
The thing to note is that the heights of "everything" (the pump, the top, the bottom, etc) are the same as OEM. But the new tank is wider, longer, and boxier, giving more capacity at a given fuel height. So, anything that gets measured off that float / fuel height will be "right", but the number of gallons in the tank at that point will be much larger. Anything that uses tank capacity in a calculation will be wrong. Fuel usage / MPG stays correct as it is measured via flow not volume in the tank.
I am adding some charts. I took a data point each time I completed a trip and graphed them. There are three I felt were most useful; forgive lack of effort on formatting, this is enough work as it is lol.
The takeaways are:
Gauge Comparison: as I think we have all experienced, the factory gauge stays "full" for a very long time before it starts to really show progress downwards. As such, the gauge overstates the fuel level until about 1/2 tank, at which point it becomes reasonably accurate. NOTE: "empty" in this case means about 5 gallons left.
MTE Comparison: MTE is, essentially, useless as it starts way lower, and slowly and non-linearly reaches zero at the same time the gauge hits zero. Because it isn't linear, there's not simple math anyone will want to do to convert it to real miles remaining.
Gallons Remaining vs. Gauge: This is another version of the first chart; this is just to make it intuitive what is happening with the number of gallons in the tank, vs. the number of gallons before the fuel light comes on.
Ok, what did I learn?
-practical tank capacity is more like 26.4-27.4;
-you'll get about 21.5-22.5 burned before fuel light
-once fuel like comes on you have about 5 gallons, for me I'm happy to drive anther 40-60 without worrying about anything, as that puts you around the oem fuel light level
-if you don't want to drive past the fuel light, you're looking at give or take 440 mile range on the hwy at 20mpg, or up to around 500 with the "factory" buffer of about 2 gallons left in the tank.
All, this is bound to be fairly long. I'll try to keep it as tight as possible.
First, a lot of haters promised me this tank wasn't going to fit because china. Well, I have a 500-mile range LC250, and they don't.
I initially posted some info on the tank in question in LC Talk, under the thread Fuel Tank Options. The tank in question is here: FK NOTVUCH 110L(29 Gallon) Main Fuel Tank Fit for LC250
Price: $1230 US, plus shipping and tariffs of (for me) about $330 as I recall.
Shipping: Ships from China, they packed it extremely well and built a wood crate to protect it. It showed up flawless. Delivery took something like two months give or take.
Customer Service: Mike Lee is the Sales Manager and is a class act. Very responsive, knowledgeable, and credible. When I initially inquired about fit, they had not tested this on the US-Spec LC. But they took the question back to their tech team and concluded it would fit, and offered a guarantee if it didn't. Obviously, it worked and they are to be commended for their efforts. You can reach them via their CONTACT tab on their website.
I am attaching some photos, all-pre-install but you get the idea.
Quality: The tank is an 5052 aluminum-magnesium alloy (corrosion resistant); the TIG welds look great, the powder coat finish was good, no visible flaws. The hardware seems to be of good quality and heavy duty. The seals provided and hoses all seem to be of OEM quality at least via visual inspection. There were concerns voiced on the previous thread about buying a chinese fuel tank - I'm not going to convince you otherwise if that is what you believe, but I can tell you the quality looks and feels as good as you're going to find, and at this price point it is hard to imagine it being better.
Installation Video:
This was for me the only source of instruction; I gave a few notes to Mike afterwards and he said they will add some written instructions for a few places where I had difficulty (removing three different fuel pump connectors without being able to really see them, thread pitches being similar but not the same on some parts and unlabeled, nothing big).
It's pretty straight forward; you remove the skid plate, support the tank, remove the hangers, drop the tank a little and remove the electrical and plumbing connections, drop the tank, pull out the pump and put it in the new tank, install a few new hangers and reinstall. The process isn't difficult, it's just the tight quarters that makes it harder
.I tackled this by myself, on the floor of my garage, with a jack and jack stands. I had the jack stands at their max length and it was just barely high enough to slide the new tank underneath. I'm talking just barely- like the fuel pump touched the bottom of the frame sliding it in. If you have access to an assistant, a vehicle lift, and crucially a scissor cart to support and lift the tanks up and down while you undo/redo the electrical and plumbing connections, you will have a much easier time. That said, I just proved it is possible to do without those things.
If you're wondering how i got the tanks up and down (the OEM with fuel still in it and heavy and awkward), I used a piece of plywood bolted to my floor jack, slid it underneath the tank and jacked it up. that was easy; installing was much more awkward - i used the same piece of plywood with some wood blocks under one end and slid the new tank up into position. You have to be VERY precise and close to the final landing spot to be able to make the plumbing and electrical connections. There is no more than maybe an inch of extra hose (especially the filler hose). It is extremely tight quarters and amplified if you're on your back trying to get the tank into position by yourself- again, a lift for the vehicle and scissor cart to lift the tank would make this WAY easier as shown in the video.
There are no issues with the fit of the tank. I know a lot of people were concerned about the rear suspension link being in the way because this is different from the lexus (and it's larger tank), but this isn't a lexus tank. It was designed for this vehicle.
I didn't measure the gas I transferred (with siphon pump) from my old tank to the new one, so I was unable to confirm how many gallons actually go into the tank before the pump stops. But, it was definitely north of half a tank, and I put 18.5gal in at the gas station shortly thereafter.
If you're wondering about fuel gauge, it will be wrong. The computer thinks you've got 17 gallons and you have 29. As far as I'm aware there is no good way to fix it on the dash. Further, the shape of the tank will make the relationship between the new tank and the oem tank non-linear. Eg., at full tank the ratio is about 1.7 (17:29gal). But the fuel light reportedly comes on with 4 gallons, which is a ratio of around 2 (2:4gal). So there isn't a clean / easy conversion factor you can apply to understand your remaining range. By far the simplest way is to set your trip A at refills, and set your mileage meter to "total average" instead of "trip average". That will give you the total mileage on the tank instead of the current trip. Then, just monitor your trip A miles and make some adjustment based on the mileage you're getting. I average about 19mpg, so 475 miles will be my mixed driving number to fuel light illuminating (25gal x19), and if the tank mpg is trending closer to 18 I'll go with 450 and if it is trending closer to 20 I'll go 500.
Overall this is a killer upgrade for me; makes the LC so much more functional for long trips without the hassle and expense of an aux tank. And, I will add, it's just as many gallons as you'd get with a saddle aux tank.
Edit again: confirmed tank is built from 5052 aluminum alloy w magnesium. Highly corrosion resistant and typically used in fuel tanks. 10% ethanol typically under normal use not corrosive enough to be an issue. If you are concerned you can use an ethanol treatment (sta-bil “in season” or “marine 360” are my personal picks) or use pure gas.
Ok, what else guys?
11/29 UPDATES
New info from vendor / me:
-Our fuel pump has an swirl pot design. I was able to confirm this elsewhere. If you're not familiar with Swirl Pots, they essentially prevent fuel pump starvation by placing the pump inside a "pot" that fills with fuel. The pump is ALWAYS submerged regardless of fuel level (unless truly empty). This prevents air in the fuel line during offroading, but in context of this conversation it also means the pump is always submerged and therefore the level of gas in the tank essentially doesn't matter from a cooling perspective. The pump is always submerged, with cool gas coming in and warm gas going out. Therefore, the legacy thinking we all grew up with that the tank has to remain 1/4 full all the time is...inaccurate. Also, you very much could run the tank down much lower than the fuel light without damaging the pump (until it goes empty...don't do that ha)
-The tank also has a built-in sump design which further reinforces fuel supply to the pump/swirl pot inlet.
-Contrary to what was discussed previously at various points in this thread, the pump DOES have a float. It is attached to a modern potentiometer, but it very much has an external float. This can be seen in the instructional video when they remove & reinstall the pump (it's quick). (photo of our pump attached also)
-The full internal volume of the tank is 110L (just about 29 gallons), however due to cavities and venting and the like, it can be expected to "take" between 26.4 and 27.4 in every day conditions. If you could slosh it around and clear airspace you could get more. It is important to keep a headspace for thermal expansion and keeping gas out of the vapor canister and venting systems...so all tanks have a headspace for that reason (as I understand it, anyways). Also if the gas pump allows for slower filling rate you may be able to squeeze a bit more if the venting rate is the limiting factor.
-I previously reported that the Fuel Light should come on at 15L remaining (about 4 gallons). Turns out they say 15L to be conservative and prevent you from stranding yourself. It actually comes on between 15-20L (4-5.25 gal) and in my experience it came on at the high end, about 5+ gallons.
-When I say "fuel light" , it isn't clear what that means. The truck gives you a pop-up message first saying "fuel low", then the gas icon turns from white to orange (these may be simultaneous). Then the MTE hits zero and you get a "REFUEL" message. The 5+ gallon point is when the icon flips from white to orange.
Gauge & MTE accuracy:
-When I filled up (twice) the MTE reads the same as always, 302. It doesn't adjust for anything, as expected. It will always be wrong and there isn't a fixed conversion factor as you'll see from the charts.
-MPG is unaffected, as expected.
-Gauge reads 100% at full, as expected.
The thing to note is that the heights of "everything" (the pump, the top, the bottom, etc) are the same as OEM. But the new tank is wider, longer, and boxier, giving more capacity at a given fuel height. So, anything that gets measured off that float / fuel height will be "right", but the number of gallons in the tank at that point will be much larger. Anything that uses tank capacity in a calculation will be wrong. Fuel usage / MPG stays correct as it is measured via flow not volume in the tank.
I am adding some charts. I took a data point each time I completed a trip and graphed them. There are three I felt were most useful; forgive lack of effort on formatting, this is enough work as it is lol.
The takeaways are:
Gauge Comparison: as I think we have all experienced, the factory gauge stays "full" for a very long time before it starts to really show progress downwards. As such, the gauge overstates the fuel level until about 1/2 tank, at which point it becomes reasonably accurate. NOTE: "empty" in this case means about 5 gallons left.
MTE Comparison: MTE is, essentially, useless as it starts way lower, and slowly and non-linearly reaches zero at the same time the gauge hits zero. Because it isn't linear, there's not simple math anyone will want to do to convert it to real miles remaining.
Gallons Remaining vs. Gauge: This is another version of the first chart; this is just to make it intuitive what is happening with the number of gallons in the tank, vs. the number of gallons before the fuel light comes on.
Ok, what did I learn?
-practical tank capacity is more like 26.4-27.4;
-you'll get about 21.5-22.5 burned before fuel light
-once fuel like comes on you have about 5 gallons, for me I'm happy to drive anther 40-60 without worrying about anything, as that puts you around the oem fuel light level
-if you don't want to drive past the fuel light, you're looking at give or take 440 mile range on the hwy at 20mpg, or up to around 500 with the "factory" buffer of about 2 gallons left in the tank.
Attachments
-
 IMG_0164.webp276.8 KB · Views: 3,291
-
 IMG_0165.webp285.6 KB · Views: 792
-
 IMG_0166.webp275.7 KB · Views: 768
-
 IMG_0167.webp252.7 KB · Views: 740
-
 IMG_0168.webp273.3 KB · Views: 752
-
 IMG_0169.webp114.7 KB · Views: 746
-
 IMG_0170.webp282.2 KB · Views: 762
-
 IMG_0171.webp164.4 KB · Views: 812
-
fd7cc00ae2a8a1410bf39ab066421dbb_raw.mp42.1 MB
-
微信视频2025-11-16_105400_422.mp4845.2 KB
-
 IMG_0188.webp336.9 KB · Views: 742
-
 IMG_0191.webp179.3 KB · Views: 735
-
 IMG_0192.webp175.9 KB · Views: 722
-
 IMG_0193.webp89.1 KB · Views: 739
-
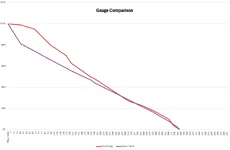 Image 11-29-25 at 10.35 AM.webp30.6 KB · Views: 606
-
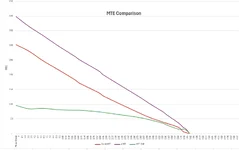 Image 11-29-25 at 10.35 AM.webp32.3 KB · Views: 577
-
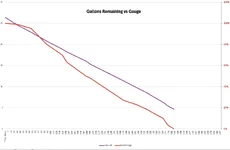 Image 11-29-25 at 10.36 AM.webp33.1 KB · Views: 586
-
 IMG_0223.webp65.7 KB · Views: 598
Last edited: